Showing posts with label pewter. Show all posts

Sunday, March 2, 2014

Bobbie's strawberry bottle

Yesterday I taught an altered wine bottle class at Design U'r Memories here in town.  Just 1 student.  But I simply had to share her amazing creativity!

She used a pink Bailey's bottle.  She loves strawberries.  So she created this centerpiece by using a heart die, then cutting a daisy flower die in half and using a leftover scrap for a stem.  Is that not just amazing???


Rows of bling at the top covered the screw on top.  Circle dies cut and draped, then shaped around the neck of the bottle.  A bottom border die.  Lots of leaves to make a vine and the word Hope.


Lots of rhinestones and bling were added and I think the end result is simply stunning!


Amazing what you can do with a few little die cuts (in Amaco's pewter) and an empty bottle!  Wouldn't you love to have this sitting on your counter?  :o)

The artist is Bobbie Broman - a very talented neighbor and dear friend.  Always so much fun to be in the room when Bobbie is there!!!  Now you know why!

Monday, December 16, 2013

Mercury glass - day 3

Today I'm sharing some of my favorites - and some of the easiest to do!    This first one was a clear glass candle holder.  Maybe 3" tall.  Airbrushed with copic marker RV09 , then Amaco's pewter die cut, with a broken earring attached to the front center.  What do you think?  This one was 47 cents at one of our thrifty stores here in town.


This one was blue glass.  So I simply sprayed the outside with the looking glass paint, spritzed the vinegar/water mix on top of that, then waited 2 minutes and lightly blotted it off so the blue glass would show through.  I used Spellbinders S4-365  Create-a-flake four die for this.  I think that die has been discontinued, but look for it on ebay.  I took apart an ornament from Hobby Lobby for the center of the die and added some bling to the round points.


This was another clear votive holder and I simply love it!  I used Copic marker B06 for the color and this time, I used a ton of color with very little of the looking glass paint.  The pewter is a different element from the Create-a-flake four die above with another pice of the same ornament.  So simple, yet so elegant!


This is a tiny little votive, about the size of a shot glass.  I die cut the border and airbrushed it with colic's B06 as I wanted color on this one.  The snowflake is from the same die.  I love this die - so many different flakes and I haven't even started layering them!


And the last one today.  This is my favorite - so far!  This one is about 5" tall.  The rim around the top of the glass was chipped so I got it for 50 cents.  It was already faux mercury glass, so I didn't have to do a thing with the glass.


I used the large die from the Venetian Motifs, S5-119.   A rather large ornament from Hobby Lobby on the front.  How fun to get these at half off and then take them apart with undue!


The top border is cut from S5-042, Fleur de Lis accents and then…..


Folded over the top rim and pressed down around the top and the bottom to fit snugly against the glass. You can no longer see or feel the cracks that were in the rim.  


All of these just glimmer and shine in the sunlight.  So incredibly pretty in the day, but I have lights under them and at night, it's just stunning!

Tomorrow, I'm going thrifty store shopping in Co Springs with my sis.  I hope we find a ton of clear glass so I can come home and play some more.  Can you believe that I am completely out of glass???

Saturday, December 14, 2013

Mercury glass and more - 1

Oh what fun it is to play…..


I'm going to spend the next few days sharing how I made these.  So first, you need to go to your local thrifty store and find glass.  Almost anything will do.  Clear glass, colored glass….all sizes and shapes.  Here's an example of a bottle and a candle votive that I found (of course, they were clear glass when I picked them up).  


While you are in the store, stack them together.  Get different heights.  Get some that will use votive size candles, tall tapers, short fat candles….and pick up used candles while you are at it.  I have several youtube tutorials showing you how to repair, restore and reuse old candles.  


In the days to come, I will share a variety of techniques, but for the look above, you will need Krylon's looking glass paint  (Walmart is the cheapest place if you can find it there).  You need a fine mist spray bottle filled with a mix of 1/2 water to 1/2 vinegar.  I don't think it matters what type of vinegar.  

For this particular bottle, I sprayed 1 coat of paint on the outside of the glass, then patted it off with a Viva paper towel (Viva is soft and flat, no embossed design in it).  Let it dry for a couple of seconds, then sprayed another layer, patted it off….did that 3 or 4 times.  

Next, I immediately spritzed the outside of the glass with the mix.  Let that set for 2 minutes.  It might not be dry, but that's ok.  Pat it off with your paper towel.  It will remove a little bit of the paint.  If you want a different look, rub it a little.  If you don't like the results, just soak the glass in 1 cup of vinegar in a sink full of water and rub all the paint right off.  I make several mistakes so always need a useable remedy!


I've made 23 of these in the past couple of weeks, so lots of experiments, loads of failures, and I'll be sharing different shots of the sun reflecting through them all.


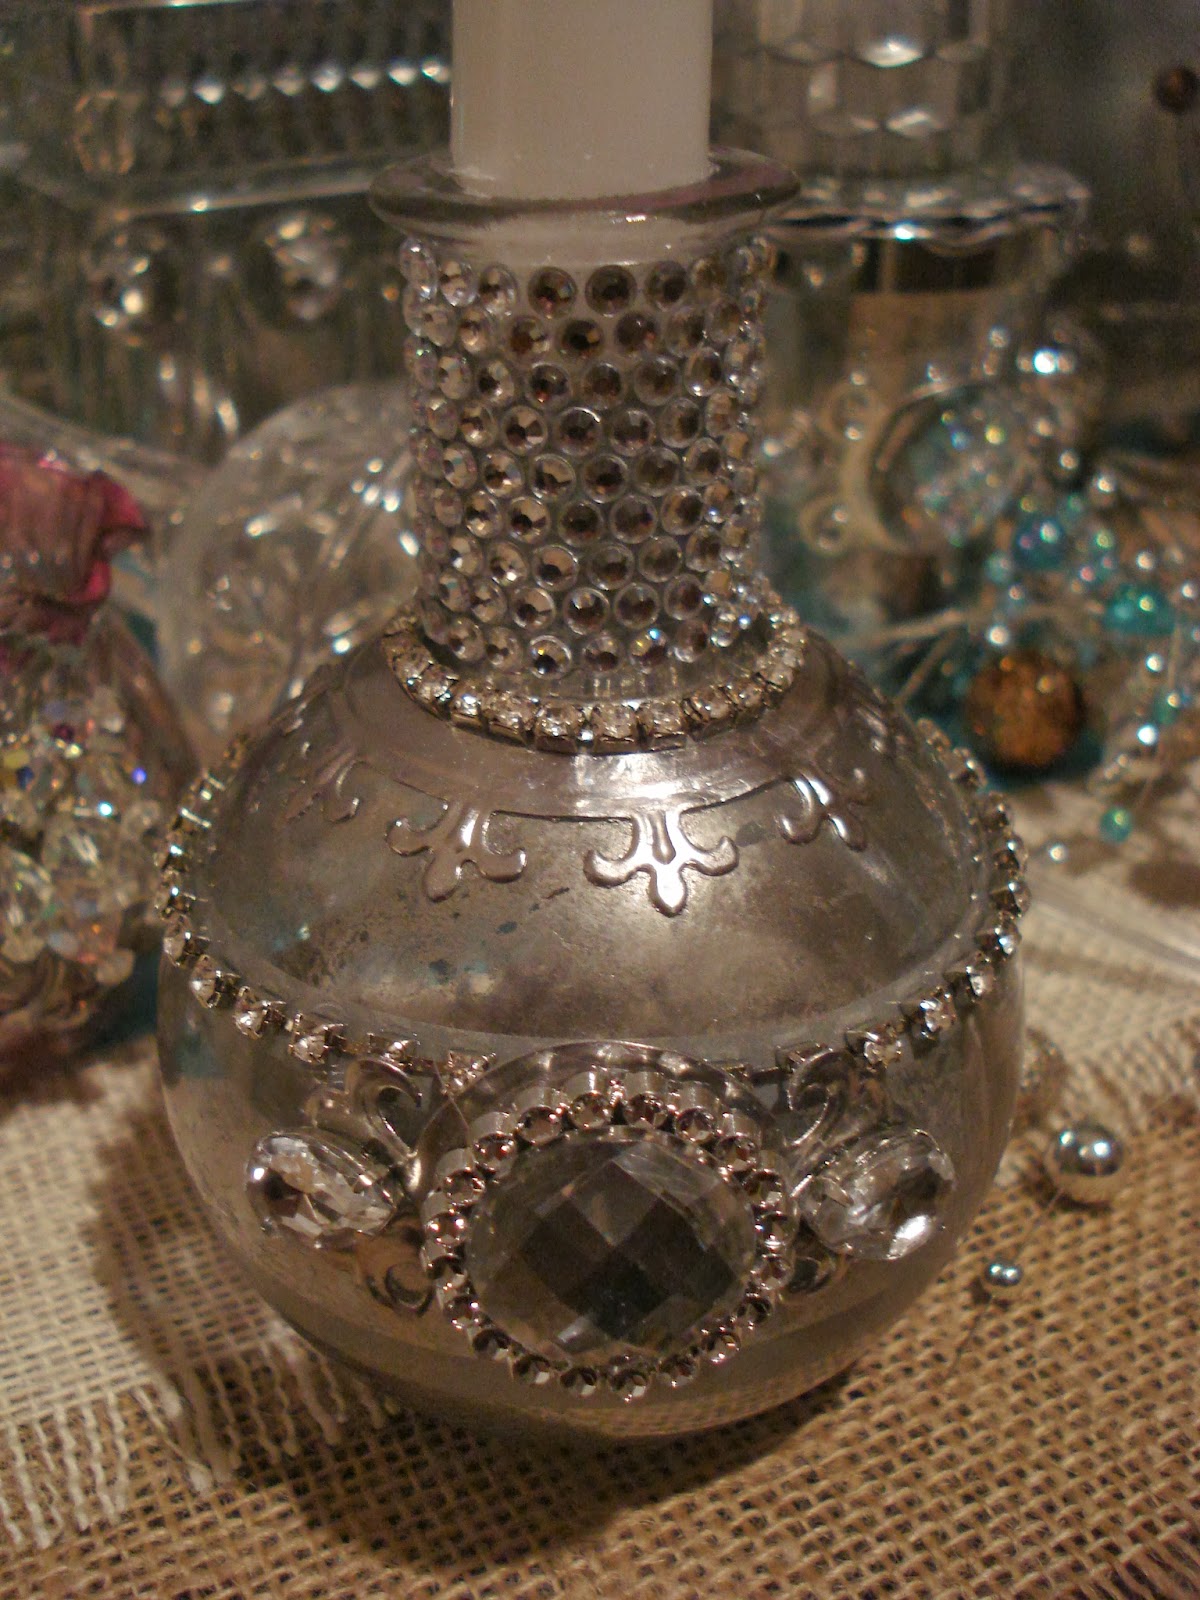
 First up is this little glass bottle.  Remember - it started out clear.  It was someone else's junk.  Now it's my little treasure!  Rows of adhesive crystals around the top and then at the bottom of the top, a row of sequins.  These are the kind that you can buy by the yard in the fabric section at Hobby Lobby.  Note, you can slide them apart, or scrunch them up close together which is what I did here.

Below that is a Spellinder's die.  This is from the Fleur de Lis Motifs and the center was removed using #3 from the Standard Circles Large die set.  Cut using Amaco's pewter - which is very flexible and will bend down around the glass and stretch to fit whatever you need.


In the front center of the glass, I used the medallion from the Fleur de Lis Accents set.  The bling on top of it comes from a half off ornament at Hobby Lobby.  Look at the ornaments carefully as most of them will just pop apart with a little bit of undue.  

Note that I'm using just the paint on these.  Tomorrow, we'll add a bit of color using the Copic Airbrush system!  Can't wait to share!!!

Tuesday, February 2, 2010

Pewter samples from CHA

One of my favorite things to do is to diecut Amaco's pewter. On the top is a spellbinders die and below is a quickutz die that I added a little repousse to. Both were stippled with alcohol ink and then covered with a layer of glossy accents. Got rave reviews at CHA!


This is just a simple piece of pewter, in a cuttlebug embossing folder, and then copic markers airbrushed over it in a spotted pattern:

A Spellbinders die, in pewter, airbrushed while still in the die.


This one wouldn't upload for some reason, so just click to enlarge. But this is freeform repousse in pewter and then I used a foam makeup sponge to apply copic marker refill for the color. Goes on so smooth!

You can get pewter at Amaco online and it's one of my favorite things to play with. Much heavier than metals. You can stretch it, give it some shape, great for embossing and repousse. Another one of my "gotta have" items. It might be out of stock at the moment....people were loving it at the show!

So, do you do repousse? Metal work? Email me if you do!

So what are you doing for superbowl? We have 36 people flying in from all over the country. Kerry's staff. It's going to be a wild weekend. I'm doing something crafty with the wives and kids.....absolutely no idea what! Today....house cleaning. Someone send Kerry an email and tell him he needs to hire it done! LOL!

Tuesday, December 29, 2009

Metal cards make it bling!

If you are having trouble getting you Spellbinder's pendant dies to cut....try them in Amaco's Art Emboss pewter! They cut perfect the first time! And my camera just saw so much bling it couldn't really get this photo as pretty as the card actually is! I used Creative Impressions silk ribbon on the bottom and stamped using a sentiment from MSE! Must be a "Colorado" day around here!!!


And is this too cute? A Quickutz die...masked and airbrushed and then just a hint of repousse to give it a little dimension. She's done in pewter as well.....I just seem to like it better than other metals. But tomorrow, I'll be working on recoloring Amaco's metals so you can match it to any piece of paper you want! How cool is that?


Quick and easy cards that just say "wow".

Oh, inside the ballerina is my stamp that says: "Dance each step of the art you create!!!"

Monday, December 14, 2009

Night 4 - Eight Nights of Lights 2009

Oh - my favorite night! All about food. Food traditions, recipes, enjoying time together. Yummm!!! So, I thought I'd share my memories of food as a child. Yes, there were lots of them!

I remember freezing cold nights where the ice on Duck Creek would freeze solid (well, ok, it was only about a foot deep!) Dad would light a fire and the kids would all come over and we would go ice skating after dark. When we were frozen stiff, we'd go back to our house and mom would have taffy ready for us to pull. She was so smart. Have you ever pulled taffy? I think you have to pull it for at least an hour! Great way to keep a whole bunch of kids busy!

I remember Sunday lunch at Aunt Dorothy's house. The kitchen would be buried deep with food and pies would line the counters and the bureau in the dining room. So much food you just didn't know where to start. And all the cousins, aunts and uncles would be together. I tried to count up once and gave up at 48. What a crowd!

And can we talk about pies? Gooseberry? Yuck! Raisen cream - which I really loved. Black Raspberry - my absolute favorite. Crust that was so good I can still remember the taste. Grandma Moore's caramels, Aunt Marilyn's tea bread ring, Mom's divinity....the list is endless. Shall I end the blog here while I go eat? LOL!!!lllll

It's intersting to me that in Christian religions, Jesus Messiah is referred to as the "bread of life". Jews have a heirarchy of blessing, and the bread they eat receives the highest blessing. It is equally interesting to me to have visited the Sinai desert and to just imagine the manna - a crystal like substance - falling from heaven every day to feed the Israelites.

Yesterday, I showed how to tool leather. Today, we'll take those same principals and "tool" metal. Some call this metal repousse, but for me, it is the exact same thing as tooling leather. I'm using Amaco's pewter - I've been using it since 2004 and it is one of my all time favorite mediums!


Amazing what you can do with a single piece of rolled pewter!

Close up of the charms. Again, these are from 1-800-dreidle


And did you notice how well I painted the light blue background? Another video?

He is the Way, the Truth, the Life....


He is the Light of the World.....the Bread of Life.

Friday, May 15, 2009

mini me angel pattern

Here's the mini me angel pattern. You should be able to drag it over to your desktop, then resize it in your photo editor. It should be 8.5" x 11".


I'd love to see your angel doll! Cut it out in metal, redline tape and chipboard. Emboss the metal, paint it, sand it, alter it. Then use red-line tape to adhere it to chipboard. Use buttons and wire or brads for the joints. Just have fun with her!

Tuesday, March 24, 2009

Airbrush experiments

You know, there are moments when I get all caught up in my art and I forget why I first started this blog.  I was chatting with a friend (Hi Vickie!) tonight and she reminded me that every now and then, I should just talk about what's going on in my life!

So, what's going on in my life?  ART!  LOLOL!  I am in a creating blitz this week designing classes for San Diego.  They may never get done as I seem to be going quite slow...until today.  Susan come over to play and all of a sudden....all of the ideas were right here.  I think I finished up 3 classes today. Perhaps what I need is a full time assistant!

If you've never taken the time to read my first week of posts, you'll never know why I started this blog.  I just reread them and realized.....I was probably the first or one of the first "inchie" designers with my layout that included 49 one-inch photos of all bad hair days throughout my life!  LOL!!!  50 years of bad hair.  It's just who I am!

And can you believe that I grew up without a TV?  Imagine that!  We have a TV in every room in the house now.  But funny thing, Kerry is off to LA this week and I don't think I've turned the TV on once.  I really believe that when you grow up without it....it's quite easy to live without it.  Most of my closest friends know that about me and they know to call me when something happens (like 911) and tell me to turn on the TV.  LOL!!!

I promise to start adding a bit more about what's going on in my personal life....but honestly, this week...it's truly all art!  When the "cat's" away.....all I'm going to do is play!!!

I'm brushing up on my metal repousse and this was my first little sample. It's a palm tree  wrapped around a candle and my base was a cricut diecut. Pretty cool.

but look what happens when you take the copic airbrush to pewter - you can literally create your own piece of colored metal.  I LOVE this!!!

For this one, I used a rubber stamp.  I thought it looked a bit like seaweed!  LOL!

This piece has some great depth to it as well:

I finished this one off - I think it could be a pendant....but I also think it would look cute on a card.  Not sure what I'll do with it....but next, I want to do a couple of seashells!


No, next I want to airbrush on friendly plastic!  No.....

OK, I think that list is endless!!! Who knows what I'll do next!  It's what makes being an artist so much fun!!!

Monday, March 16, 2009

Friendly Plastic Cuttlebug Jewelry - San Diego Class

OK, I think I've got this down pat and can teach it while I'm out in San Diego. It's Friendly Plastic pellets melted and turned into a sheet, embosed, inked, and then turned into jewelry:


And I'll show you Linda Peterson's bezel setting:

Look at that depth!  You'll have to come to class to see how I did that!!!

If I have time later this summer, maybe I'll put together some kits so those of you who don't live in southern California can do this.  Hmmm....might be something we do at the Lucy McGoo retreat this fall!!  I really love how this turned out....and I think we can make them in under 2 hours!

Friday, February 27, 2009

Cricut and pewter

Yep, you read that right!!! You can diecut PEWTER and METAL in the Cricut!!! WOW!! I figured if you could cut chipboard, you could do metal. And I was right! Here's the settings:

Slowest speed
Highest pressure
Thick cut blade set to # 6.

One pass through is all you need!!! I did the word SOUL in Amaco's Art Emboss Light Weight metal:


Pulled it off and ran each letter through a cuttlebug embossing folder to give it texture:


I'm actually using the reverse of the purple side.....because I didn't have the shade of metal that I wanted. Here's the back of the "S":


To get my correct shade, I simply used my copic markers in the airbrush and applied smooth color that dried in 2 seconds!


OK - it really was so fast and easy!!! Next I started diecutting in pewter - Amaco's Art Emboss Pewter. Same settings. Equally excellent results! No, I'm not sharing just yet. I have a project brewing that is going to incorporate almost every single technique that Linda and I come up with this week. I think you are going to love it.....it has inspired me to just keep experimenting and trying new things!

We sort of took most of today "off". We ran up to Loveland to visit our friend Judy Caulkins who owns Judy's Stone House Designs. Remember the heart shaped purse that I turned into a birdhouse? I'm thinking we might just have to decorate a purse in Friendly Plastic!!!

Stay tuned for more fun coming up soon!!! I'm exhausted! But when you are having this much fun...who cares about sleep? Oh, and I have to report....a little Chambord with your Diet Coke sure helps the creativity flow! LOL!!!