Showing posts with label thrift stores. Show all posts

Saturday, December 14, 2013

Mercury glass and more - 1

Oh what fun it is to play…..


I'm going to spend the next few days sharing how I made these.  So first, you need to go to your local thrifty store and find glass.  Almost anything will do.  Clear glass, colored glass….all sizes and shapes.  Here's an example of a bottle and a candle votive that I found (of course, they were clear glass when I picked them up).  


While you are in the store, stack them together.  Get different heights.  Get some that will use votive size candles, tall tapers, short fat candles….and pick up used candles while you are at it.  I have several youtube tutorials showing you how to repair, restore and reuse old candles.  


In the days to come, I will share a variety of techniques, but for the look above, you will need Krylon's looking glass paint  (Walmart is the cheapest place if you can find it there).  You need a fine mist spray bottle filled with a mix of 1/2 water to 1/2 vinegar.  I don't think it matters what type of vinegar.  

For this particular bottle, I sprayed 1 coat of paint on the outside of the glass, then patted it off with a Viva paper towel (Viva is soft and flat, no embossed design in it).  Let it dry for a couple of seconds, then sprayed another layer, patted it off….did that 3 or 4 times.  

Next, I immediately spritzed the outside of the glass with the mix.  Let that set for 2 minutes.  It might not be dry, but that's ok.  Pat it off with your paper towel.  It will remove a little bit of the paint.  If you want a different look, rub it a little.  If you don't like the results, just soak the glass in 1 cup of vinegar in a sink full of water and rub all the paint right off.  I make several mistakes so always need a useable remedy!


I've made 23 of these in the past couple of weeks, so lots of experiments, loads of failures, and I'll be sharing different shots of the sun reflecting through them all.


 First up is this little glass bottle.  Remember - it started out clear.  It was someone else's junk.  Now it's my little treasure!  Rows of adhesive crystals around the top and then at the bottom of the top, a row of sequins.  These are the kind that you can buy by the yard in the fabric section at Hobby Lobby.  Note, you can slide them apart, or scrunch them up close together which is what I did here.

Below that is a Spellinder's die.  This is from the Fleur de Lis Motifs and the center was removed using #3 from the Standard Circles Large die set.  Cut using Amaco's pewter - which is very flexible and will bend down around the glass and stretch to fit whatever you need.
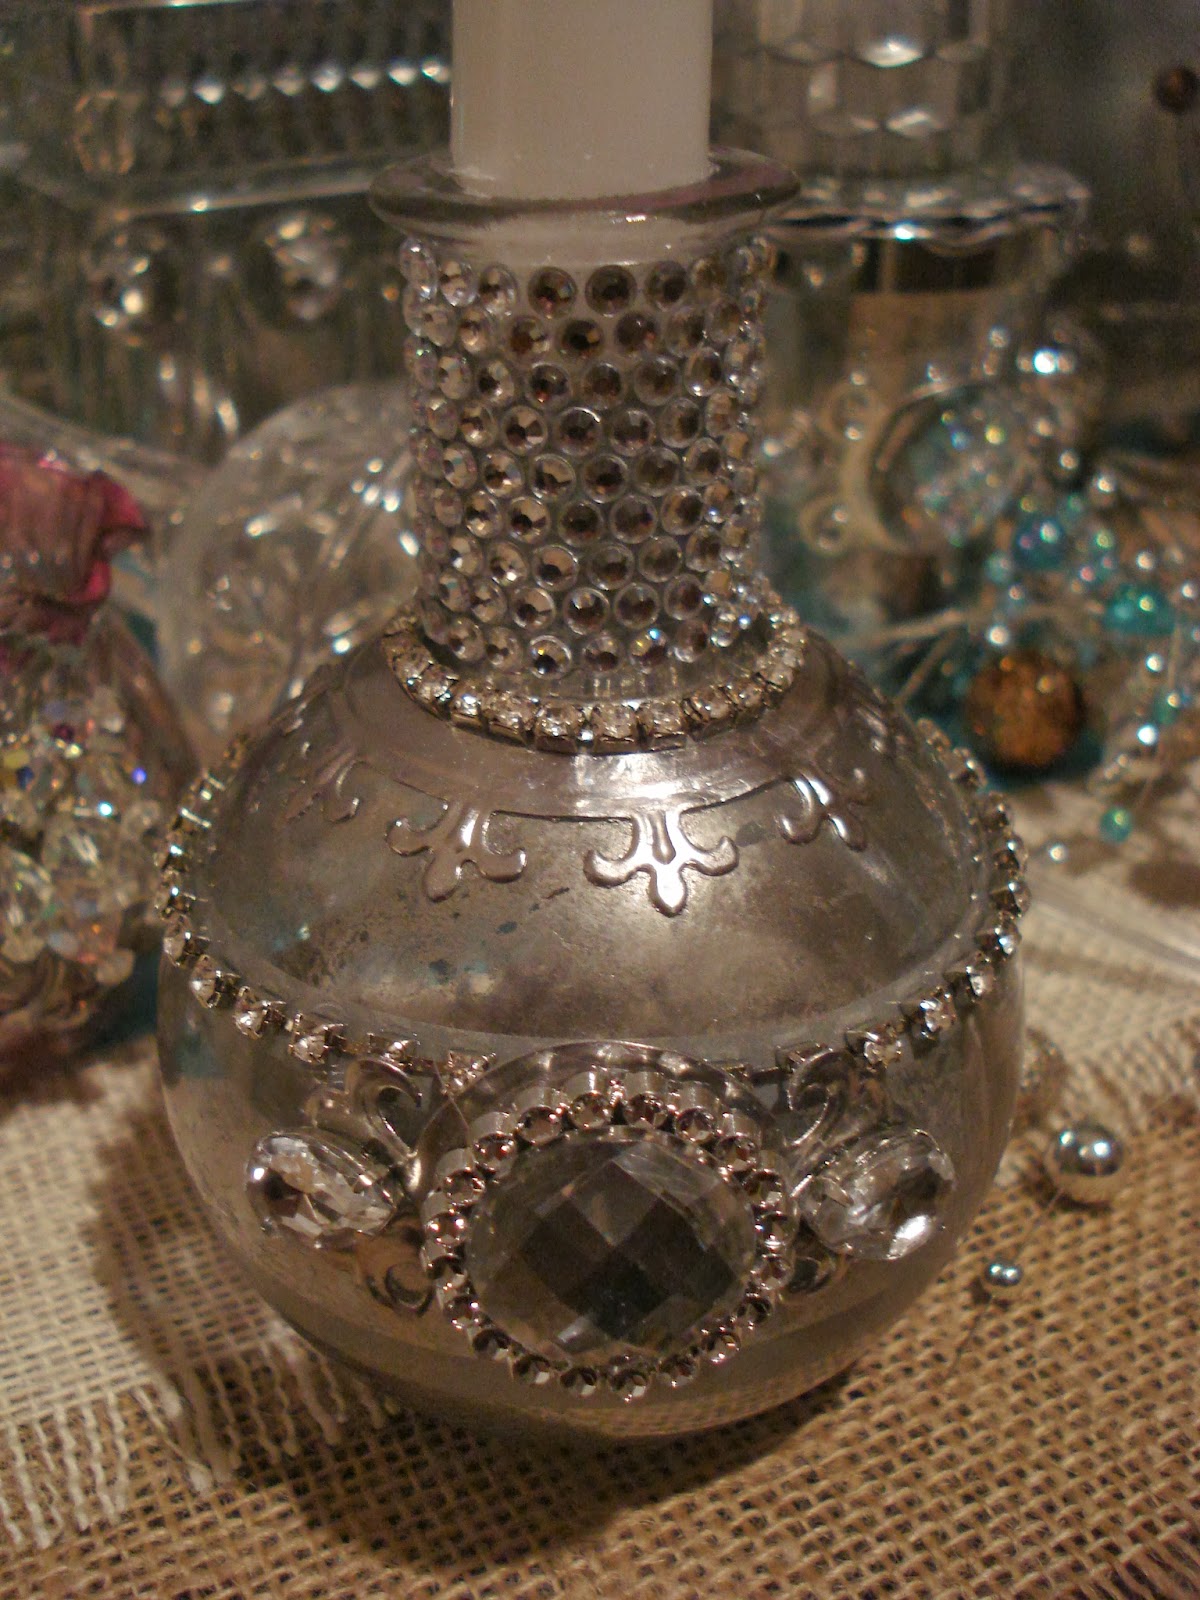

In the front center of the glass, I used the medallion from the Fleur de Lis Accents set.  The bling on top of it comes from a half off ornament at Hobby Lobby.  Look at the ornaments carefully as most of them will just pop apart with a little bit of undue.  

Note that I'm using just the paint on these.  Tomorrow, we'll add a bit of color using the Copic Airbrush system!  Can't wait to share!!!

Thursday, April 25, 2013

Bitty Baby - found a new home

I love going to thrift stores!  And I can usually find fun stuff - like this Bitty Baby - for only $2.99!!!  Yes, she needed a little cleaning, but worth every penny!


So, if you're a mom with little kids and you don't have any time to sew clothes for either the Bitty Baby or any American Girl doll, here's my tip.....look for Carter's clothes in the new born size - look for labels that say 5 - 8 pounds:


Well, yes, the tops are a bit too long!


But just cut them off at the hips, which gives you enough room to hem the shirt (I don't even bother doing that!)


Just tuck them into the pants, add a hat, and you have a precious outfit that turns a naked doll into a tiny sweetheart!  Here, my new bitty baby is sitting with her "older sister" which is yet another doll I got at the estate sale and restrung, re-wigged, and added her to my growing collection.  They are sitting with a bear that my son gave me years ago, next to a pillow that was embroidered by a friend's mom.  It won 1st place in a fair!  Behind the dolls, you can just see the tips of a pair of pillowcases that my great aunt Nellie embroidered.  Obviously, I do not store things that are given to me - I put them out on display!


The shirt was $1.99, the pants were $.99, and the hat was $.59.  I cannot make clothes that cheaply!

Speaking of my son, here is the outfit that he wore when we brought him home from the hospital.  I've kept it all these years!  I think it's high time I find a doll that will fit into this.  Maybe even another bitty baby?  Jason was a premie by 6 weeks, weighing in at only 6lb.  Imagine how big he would have been had he been born 6 weeks later?  I still think the doctors were off on their calculations!  But this is one of those 5 - 8 pound outfits....so I'm off to hunt for the perfect doll!


Do you hunt your local thrift store?  Or are you more like Kerry who refuses to even consider going inside one of them?  Colleen and I just went to Colorado Springs yesterday and had a blast stopping by 4 thrift stores.  Sure wore me out....but I came home with loads of treasures!  I'll just bet my neighbors wonder how I fit all those shopping bags into this tiny little cottage!!!

Saturday, February 25, 2012

Finally - the new studio

And it's almost done. OK, is a studio "ever" done???  But I am happy with what we've got done (Colleen helped me with this, too) and am most happy that I can walk away, close the door and leave the mess!

The room faces north.  Wonderful light, but no direct sunlight, so no heat.  This should be a commercial for Jetmax!  Most of my cubes are along the wall on the left.  There's a double desk in the middle of the room.  Another desk from Jetmax cubes on the right under the TV, some behind the door and more in the closet.  I've been collecting the cubes for 3 years.  Mostly on Thanksgiving day when they are 55% off.  That made the older ones ($29.99) about $15 each.  They are light enough that I can move them any time I need to.

Ok, because I shot directly into the bright daylight, it doesn't look too bright inside in this photo - stick with me!


This is from the door going in, there's a small bath on the right and that's a huge walk-in closet on the back right (on the angle.)  Note the flood lights and the alcove lighting.  Plus 2 ott-lites on my desk.  The walls are a very pale blue except the one on the left.  Excellent to view color in any of my art projects.


Don't you love the dress forms and baby dresses?  Nothing is new, just pulled from other dust-catching corners throughout the house.  They are perfect against the dark blue wall.  I split the paint at the right end to cover the cord cover coming down from the ceiling.  Gives the nook it's own place in the room and covers the cord.  These dress forms are from Hobby Lobby.  They come black and I spray them white.  Usually get them on the clearance aisle at 66% off.

Kerry hung a flat panel TV with a built in DVD on one of those mounts that swivel up and down and from side to side.  The chair at the table turns around to the desk under the TV and with the mirror on the right, I can use this as a makeup desk.  I'm old.  I need to sit a lot.  LOL!!!


It's such a perfect reading nook.  I found a memory foam queen pad on Craigslist and cut 24" off for the bench.  (what was left was perfect to go on a twin size bed)  Then I sewed up a duvet and used it like a pillowcase over the foam.  Most of the pillows are from thrift stores as well.  Bleach.  The perfect solution to everything white!  One friend came over and sat down, looked out the window and declared that she is going to do this in her home.  I think that's the ultimate compliment!  The window scarf....$1.99 at Goodwill.


This is the wall that's not done.  I'm going to do swirls in raised plaster painting in white.  When they get done I'll post photos.  For now, it's a daybed.  When my back gets to hurting, I just take a break, put the heating pad on the pillows, turn the TV that direction and take a rest!  The daybed cover was made by cutting off the ends of a queen duvet.  The 2 jetmax cubes face the bed and provide storage for anyone sleeping there.  I should also mention this is an adjustable bed, so if you need a recliner to sit in...you can adjust this to fit yourself perfectly!


Behind the door to the room - more cubes.  The one on the top is the double cube for the cricut and opens upwards so nothing can go on top of it.  This turned out to be the perfect spot with the little drawer shelf above it.  OK....those drawers are empty.  Can you believe that?  Guess I need to find more stuff!!!

 Inside the walk in closet, I decided to put up shelving and use the fabric cubes you get at Target.  Only I found 6 cubes on craigslist for $10.  Amazing deal!  I used my p-touch to label everything.  And it beats taking up space for a dresser - that would probably be too heavy for me to move!  I used 4 more jentmax cubes in here to create a sewing table and put the paper cubes so when I close the door, I don't see that "mess".  Clothes are hanging at the end of the closet on a double rack and there are more shelves on the other side.  The closet is bigger than some rooms at 5' x 7.5'


Next blog (in a couple of days) I'm going to show you that the difference is in the detail when designing your studio.  There are a ton of little tricks you can do to maximize space and just make life a little easier.

In the meantime....I'm in to white right now.  This was one of those dressform notepads that you've seen everywhere.  Again, 99 cents at the thrift store.  It was red and gold.  I recovered the front and back using paper, lace and ribbons.    It's perfect hanging on the back of the ott-lite.


Then, the blog after that, I think we'll talk about re-designing your closet using thrift store finds!  Can you tell I'm having a blast on a budget?  Kerry and I just figured out that with paint, new bookcases from Ikea, new window coverings...and then all my thrift store finds, we've spent about $400 and have a whole new house!  Maybe I really should come up with a book (or a DIY show) titled "How'd you find that?"


Thursday, May 19, 2011

My "home" for unwanted Judaica.....

So, whenever I go thrift store shopping and see anything Judaica, I "have" to buy it.  I simply can't leave it at the thrift store, thinking that it will go unloved another moment!  We have a new Goodwill store that is on the way to the post office.  And since I'm ebaying right now....I'm always on my way to the post office! Such an excuse, huh?

Today, I found a candle holder.  It was horribly rusted over.  I should have taken the "pre" picture, but forgot.  It took an hour of sanding with 600 and 400 grit paper, but the results are well worth the effort:


So that cost me 43 cents!  Then I remembered a serving plate I had found quite some time ago at another thrift store and pulled it off the shelf and cleaned it up:


Today's second find was a heating thing - put the candle inside and pot on top.  Probably an incense burner, but I found it charming, especially at just 45 cents!


I do love to make "dust corners" - little scenes of things I collect - that are good at collecting dust!


but that looked too plain, so I added candles and some flowers and I think this is the beginning of a new dust corner in my home!


While in Ft Lauderdale, Ruth took me to numerous thrift stores.  I got one photo in a brand new goodwill store down there, I swear it looked like a Dillards or Macy's!  Quite impressive!  The home goods section looked just like a Hobby Lobby.  But of course, they told me I couldn't take photos.  :o)


So, I am now a home for unwanted Judaica.....much better than leaving it at the Goodwill store!  Wonder what I'll find on my next thrifting trip?  It's always such a fun surprise!!!


Be sure to check out these links:
My Etsy Store
My ebay auctions