Showing posts with label cricut. Show all posts

Saturday, August 17, 2013

I love Hobby Lobby's 80% off sales at the end of the season.  I can always find something.  OK - I can always find way too many things!  This year, they had this big pillows with words like "Relax", "Sit", "Rest" on them.  While I didn't like the words, I thought the pillows had great potential.  The one on the right is as sold.  The 2 on the left are just pillow covers that HL has half off every 2 - 3 weeks.  I used my cricut and the Home Accents and Decor cartridges to get the bird on the left and the flowers.  I'll blog "tomorrow" about the bird on the right!


So those 2 pillows were the inspiration for the birds on the bottom of the pavers in my last post.

Below, the lamp is another HL find, but it was silver with a white shade.  I used turquoise acrylic paint and the new Krylon mirror paint and simply love how it turned out!


Here's a close-up of the lamp - it is just perfect!  Oh, and I just spray painted the shade with some tan paint.  Who knew it would turn out looking so much like burlap?


I used my cricut again to cut out these designs, then traced around them on fabric and filled them in.  Used a fabric marker to start, but a sharpie works just fine!


I have 2 very long sofas in my tiny living room.  So for the other sofa, I bought more of the big pillows with words on them and then added ribbon and flowers to cover the words.  Easy to sew it on - these pillows had zippers in the covers, so easy to remove.

The tiny printed pillow was 80% off at HL and the lamp shade was half off.  So a whole new look for not much of anything!


The pillow in front is a plain cover where I added ribbon and flowers.  Some of those flowers were from the jewelry and hair embellishment departments.  The pillow in the back - that's a piece of printed burlap from the fabric department.  The Cali-lillies were 99 cents at the thrift store and they are down in a group of lighted pussy willow stems.  99 cents!!!  All I had to do was iron and re-shape them.  One of my favorite flowers!  


and mom painted cali-lillies for me years ago - I am so blessed to have a home full of her wonderful art!


Now, decorating my home really isn't an excuse for not blogging.......but just wait!  I love using my cricut, hot glue gun and other craft tools to create a nest I love coming home to!

Wednesday, April 17, 2013

All those empty cricut boxes

Now that Michaels sells this nifty little organizer to put your books and cartridges in - what did you do with all those empty boxes?

I set off to decorate a few of mine!  I loved the old dioramas that we made in grade school and these boxes are the perfect size for them!

Here's the front of the box.  diecuts, flowers, pearls, bling.  Love this paper!


a diecut dressform and then Jolee's stickers - really!  And prima velvet flowers. 


So my cricut box is now a perfect closet!


But then I found some old battery operated lights and decided I needed to do something to use them.  This was a bit more difficult as I literally built a faux back to the box to hide the battery and wires so I still had the full depth of the box to play with.  This one has to stay open, the first one can be closed.

The lights are on the top left side of the open box.


The deer are die cuts.  The 3D snowmen are ornaments from the thrift store.  Tim Holtz trees.  The snowflake border diecut across the top, ok lots of die cuts.  You'll have to look at these closeups...and I made the tissue paper tensile  on the bottom.


The deer are cut in glitter paper, and there's loads of crystal stickles glitter that just doesn't show up.  vintage blue rayon ribbons.  Even a tiny little bird in the tree.  It's so much fun to have to hunt to find all the little things buried in this former cricut box!


I do think I love doing dimensional paper art like this and diecuts just make it so much fun!  Most of these are from Memory Box.  Even the paper in the background is gorgeous.

So once again, what did you do with your empty cricut boxes???


Wednesday, January 5, 2011

Cricut Flakes

Last year, I hand cut a ton of huge snowflakes and hung them on the fake tree when we had our first big snow. Well, we had our first "countable" snow with about 3" let on the ground last week and I got out the cricut machine.  So easy to make 3-D snowflakes and hang them up! And then, with a little bit of art glitter and some lights inside the tree...I have snowy bling!


and congrats to Cricut! They KNOW that snowflakes have 6 points....and really look like a Star of David!

Maybe I should say I have a "Star of David" tree!

Monday, July 12, 2010

and the winner is......

The Jewish Genealogy Society of Colorado!!!


There was an international poster contest where each society could enter a design. I designed this poster for the Colorado group....and we won!!! So I have to explain - this was my first foray into what I'm going to call digi-digi art. You should give it a try!

A few days ago, I uploaded a piece of background paper that I had made using photoshop (digital scrapping). I printed out that sheet, then used my Circut (digital diecutting) to cut the tree (Heritage cartridge) and stars (Joys of the Season cartridge) in regular cardstock. Inked the edges, attached them to the background paper and scanned them back in. The rest of the poster was done using photoshop. Quite easy, gave it some dimension, and really fun to do.

I used Tina's Yiska Hebrew Brushes in photoshop. Ranger distress ink. My Epson 13x19 printer finally came to use once I got the ink in the cartridges flowing again! Oh, I used some other photoshop brushes to create the flourishes on the background paper - no idea who created them. But I like the idea of combining what you can do in photoshop with what you can do with the cricut. Digi-digi. Fun stuff!

I'm so honored to have been asked to design this poster. Thanks Ellen!!!

Thursday, March 4, 2010

His Glory

I could turn this into a whole discussion about right side/left side brained people. But for now, I'll talk about the right side - the artistic side. The side the loses all sense of time and being... when you allow yourself to just be there. I think it is the healing side of the brain. When I'm doing art, I don't think about anything else in the world. I just play. It is a place I can simply go and not think about surgery, or doctors, or anything else.

My brother is an amazing photographer and I saw this photo of his online yesterday. I had to scrap it.

There are moments in life when you see something and you simply say, “there is a story in that.” My brother took this photo. And when I saw it today, it seemed to fit my life. I am but a naked tree. Nothing to protect me. Nothing to cover me. Nothing to shelter me. Nothing but the grace of Jehovah Jesus Messiah. I am standing alone in the pasture. But I am not alone. I am surrounded by His presence. It is everywhere. In the sky, in the grass, in the distance and up close. It pulses through my very veins, it wraps me tight and keeps me safe. And then I close my eyes, open them again, take another look at the photo and I see Jehovah as THE Artist. He created each blade of wheat. He designed each twig on each branch on each limb of each tree. And He painted the sky with all of His glory. He has brought a shadow in the foreground of my life right now, but I can see beyond it and know that because I am wrapped safe in Him, no matter what happens, it will be ok. Praise Jehovah.


Do you see the shadow in the foreground of the photograph? And the clearing on the horizon in the background? Do you see the painted sky? Do you allow what you see to speak to you in so many ways? Do you see His Glory in everything around you?

Art. amazing, wonderful, healing therapy. Praise Jehovah!

Friday, February 26, 2010

FAITH

Just when I thought I was going to start telling the story about Cotopaxi....."life" smacked me up the side of the head and my path has taken a sharp turn around a bend that I'm just not so sure I want to go down! We found out on Monday that Kerry is in need of 5 bypasses.

FIVE! OK, that as a big "yikes" for both of us. And I have not had a single urge to do anything creative this week. Well, I haven't had time. We have been in and out of doctor's offices, labs, tests and next Tuesday, we meet with the heart surgeon and hopefully will have a date for surgery shortly after that.

Does he have options? Probably not. They did an angiogram last Monday and it shows multiple blockages in every artery. It's his diabetes. The cardiologist said it has chewed up all his arteries.

So I will post updates here from time to time. We are now forced to keep a low glycemic/heart healthy menu. That took a major chunk of my time this week - planning meals ahead of time. We have to eat on a schedule. No more being "retired" - it's back to 8, noon, and 5:30 pm.

While the risks are huge for him because he has had diabetes for most of his life, and other complications, I was thinking about "faith" today. Which I think is really trust. Trust that no matter what happens, it will be ok. And I honestly believe that. I also decided we needed a little humor in our life today and that inspired me to go find a photo that I scanned at his parents house years ago. Just looking at it totally cracks me up. I think it was a confirmation class in a Lutheran church. Kerry - in a white robe? Looking all innocent? You have to know the guy to know that there has never been an innocent bone in his body! Yet I think the photo is beyond adorable.

My family and friends will crack up when they see this....but while that's the humor that I need today, I know each moment that Jehovah will take care of us, will provide for us, will guide us through this....and no matter what happens...it WILL be OK.


Wednesday, February 17, 2010

A world lost in 4 generations?

Tuesday night, I finally found "Tuesday Night Live in Jerusalem" on TV. Channel 366 if you have Direct TV, or look for JLT. Ari said that most Jews today are only 4 generations from being devout. That all you have to do is start to study. I happen to think that applies to the rest of us as well. 4 generations ago, our ancestors were all pretty religious in one way or another. I think we have lost a lot. I've written already about how language was lost in my ancestors in just 3 generations. Along with language is customs, culture, photos, memories and stories.

Today I start a journey that I've not taken before - scrapping a story that is not related to me in any way....other than the fact that Dad owned a Texaco station in the place the story took place.

I've gotten just a few emails from you all asking about genealogy and how to get started. So, here are my thoughts. Interview your parents and your grandparents. Ask cousins, aunts and uncles what they know. Oral histories are the best place to start and 9 times out of 10, you can prove the oral history with legal documents.

Next start with the 1930 census. It's the most recent available to us. Join ancestry.com or another site that will give you access. Worth every penny! If your grandpa was 40 in the 1930 census, then look for him as 30 in the 1920 and so on. Don't bother looking at the indexed names. Take the township where he lived and look at each individual name. I swear....people could not write and today, the people doing the transcriptions don't have an ounce of logic! LOL!!! Newby is NOT Neuman, no matter how you look at it. But I know, it's just a job and they are in a hurry. So, tip #1 - look at each page of the census. Usually, family lived pretty close together, so if you find someone with a similar name, start looking real close!

Tip # 2. Anything in writing is only as good as the person who took down the information and we all make mistakes. But look for the obvious. 2 sisters born 6 months apart....probably something written down wrong.

Tip # 3. Think about spelling. No one knew how to spell and mostly did it by how it sounded in earlier census records. Moore could be Moor, More, Mohr, Muir and so on. Clark could be Klark or Clarc or Klarc. And then add accents. My ancestors came from Germany. Haus became House. And in one census, it is written Hauce. Hmmm....Not sure about that one!

Tip # 4. Until about 1917, you could change your name anytime you wanted. To anything. We didn't have driver's licenses, etc. In my family, the story was told that 2 brothers got mad at each other and the one changed his name from Kerr to Karr. Sure enough, that is exactly how they are in the 1930 census!

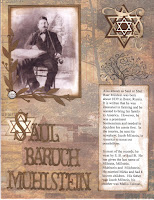
So, when you find something, don't just write it down, do something with it. Today, Kathy came over and gave me an almost full day lesson in the cricut. WOW!!! I have been having fun using my jukebox and Design Studio. Amazing technology. We'll see where I can take it.


Note, just click on the photo and it will come up in it's own window. IF you are a descendant of the colony, feel free to print and make your own scrapbook as you follow along with the stories here.

And please email me! I'd love to hear from you! jlowe54@gmail.com

Saul Baer, Sal Baur, Baruch, SB....he changed his name on nearly every single document found. He died as S. B. Milstein. I have decided to say that his name is Saul Baruch Muhlstein because that is the name I found on the ships register which is the earliest document found.


Last tip today, invest in some type of software. I use Reunon for Mac, but have used Familytreemaker in the past as well as other packages. I kept everything by hand for years and still have boxes of stuff to enter into my computer. OK, it may never get done. But remember, I've been doing this off and on for over 40 years. Loads of stuff to scan!

Build a family tree and add to it as you find new information. A tree in itself can help you find people and I'll talk about that next time. And really, I plan to scrap my way through part of the story of Cotopaxi, but as I do it....look at the layout. Can you tell what is store bought and what I made myself with the cricut? Kathy showed me how to merge different elements together and I think I may just go crazy combining diecuts! You will have to look hard to see that the flourish and star in the upper right corner are one piece with other stars layered on top and below them. Truly gives great dimension to a page!

Thursday, April 9, 2009

Where is the little girl?

Where is the little girl?
I have lost her today
I need to go find her
And see if she will play!!!

Mom and I have been playing this morning and I made this for her friend Elaine


I laid diecuts made with the cricut and cut in regular 80# white cardstock on top of watercolor paper...and then started painting with Twinking H20s.


I decided that my frog is sick - he has the measles today....


and my tree has gold leaves.  Well - all I said was we were playing!  It's not perfect, but we did paint.

I think that tree is pretty good considering it's watercolor paints on regular cardstock - not watercolor paper!

Now, of course, the one mom painted is just perfect!  So 10 days after a stroke.....mom is back painting.  Isn't she amazing?  I will post her painting tomorrow - it has to dry first!

Who knew you could use diecuts to create 3D watercolor paintings?  Truly fun!!!

Friday, April 3, 2009

Play with me

I'm going to do 2 copic marker classes while I'm in San Diego. This one is a beginning airbrush class. And I just love how it turned out.


I've actually precut all the little diecuts on the cricut machine. I'll be teaching how to use diecuts as masks, the negative space from diecuts as masks, How to apply copics to acrylic to create layers using the diecuts, how to paint multiple colors using an airbrush, and so much more!


I've had a regular airbrush for about 25 years. I don't use it often, but I have used it enough in the past that I know all the tricks and tips for using one. When I switched to using copic markers...it took me a little practice...but it's amazing how many of the tips can be transitioned to the copic. While the company offers a certification course....I think perhaps playing with me - you'll learn a few things that they haven't discovered yet!

Monday, March 2, 2009

Diecutting Friendly Plastic with a Cricut!!!

We did it!!! Yeah us!!! With a little help from our friend Kathy, we were able to diecut friendly plastic with the cricut! Is that just amazing???


So once we got it tested, I decided to add colorant and see just how big we could go. Mixed this with cranberry alcohol ink:


This one is 3" across! It's actually the angel wings from the dress up cartridge....but sure looks like a butterfly to me!


You will need to roll the Friendly Plastic paper thin, then tape it to the cut mat and that's all it takes. Slowest speet, Most pressure, thick cut blade on highest setting, and cut it out 3 times. WOW!!! Here's what's left and remember...just toss it back into the hot water, remelt it and reuse it!!!


My gosh! Diecutting Friendly Plastic with the cricut! What's next? Oh yeah, I need to go emboss this in a cuttlebug folder and ink it up!!! LOLOL!!!

Friday, February 27, 2009

Cricut and pewter

Yep, you read that right!!! You can diecut PEWTER and METAL in the Cricut!!! WOW!! I figured if you could cut chipboard, you could do metal. And I was right! Here's the settings:

Slowest speed
Highest pressure
Thick cut blade set to # 6.

One pass through is all you need!!! I did the word SOUL in Amaco's Art Emboss Light Weight metal:


Pulled it off and ran each letter through a cuttlebug embossing folder to give it texture:


I'm actually using the reverse of the purple side.....because I didn't have the shade of metal that I wanted. Here's the back of the "S":


To get my correct shade, I simply used my copic markers in the airbrush and applied smooth color that dried in 2 seconds!


OK - it really was so fast and easy!!! Next I started diecutting in pewter - Amaco's Art Emboss Pewter. Same settings. Equally excellent results! No, I'm not sharing just yet. I have a project brewing that is going to incorporate almost every single technique that Linda and I come up with this week. I think you are going to love it.....it has inspired me to just keep experimenting and trying new things!

We sort of took most of today "off". We ran up to Loveland to visit our friend Judy Caulkins who owns Judy's Stone House Designs. Remember the heart shaped purse that I turned into a birdhouse? I'm thinking we might just have to decorate a purse in Friendly Plastic!!!

Stay tuned for more fun coming up soon!!! I'm exhausted! But when you are having this much fun...who cares about sleep? Oh, and I have to report....a little Chambord with your Diet Coke sure helps the creativity flow! LOL!!!

Sunday, February 22, 2009

Master's degree in cricut - already!

OK, I think I've already earned my master's degree in cricut! LOL!!! What do you think?


I used only Ranger's Distress Ink today and blended to match the background paper. Not too bad, huh? But it looked a little different before I started with the inks. Yes, I'm sharing secrets here....I sort of create my "picture" from all white:


35 diecuts here....and that's just part of it!!! But I like cutting in white 80# cardstock as I can flip them and use the reverse side if it works better.


And the mountains were cut in 3 different sizes and then I cut up the strips to postition them where I needed them!


OK, go check out that top photo again! LOL! Look how closely I matched those mountains to the background paper behind it! Not too bad! This is another LO from mom's door. The poem at the bottom reads:

When I was just a little girl, I had a horse to ride.
All I ever wanted to do was spend my time outside!
I moved out west and raise my kids and painted pictures, too.
Grew some flowers, hiked the hills...always had something to do.
And now I'm here with all my friends making cards and painting scenes.
But I still think I need to "work"...it must be in my genes!!!

Notice the flower garden to the left of the pic of mom and her horse? I just really had a blast deciding what to use on this one. Everything came from the dress up cartridge, so how cool is that? Hope mom will like!!!