Showing posts with label Nestabilities. Show all posts

Tuesday, August 24, 2010

Spellbinders frameabilities

So, for this one I'm using only 2 new dies, mixing them up, to make unique frames.

This die has loops that go out:

This is the original oval scallops with the new mega scallops - and yes, I did cut this all at one time - absolutely cool!
So, you can make a 1" frame by layering them like this - we all know how to do this

and you can make a wider frame:

You can cut small ones inside the mega ones now......great for heritage layouts.

So, next, try mixing up the different dies to give you a different look to your frames. Remember, again, the mats for these are 8.5 x 11", so you are getting some very nice sized frames by doing this:

When cut, embossed and inked, here's the larger frame:
This is all 3 put together:

The inside frame and the small label:


So once again, the possibilities are endless when you start to combine the new mega dies with nestabilities and shapeabilities to come up with your own creative way to do frameabilties!!!

Monday, July 26, 2010

Thank you cards with all those flowers

I decided to turn all the flowers into "thank you" cards for Kerry to send out for the gifts he received during his surgery. So, if you read my blog - don't expect one - yours is here! LOLOL!!!

On this one, the sentiment is inside


I didn't make a video of this flower, it's just to easy. Cut scalloped rings, cut in half, fold over with a brad in the center - fun, huh?


Might have to do more of these:

When you make the whole background match, the flower really stands out:


Another one:

I could have done them all the same, but what's the fun in that? So variations you can make using the videos I've done over the past 4 days. And of course, you can cut these in fabric, metal, leather....anything. Give it a try!

Finally, with just petals I had left over, I put this cute card together:

Quick, easy, fun.....I hope the recipients enjoy them as well!

Thanks for watching the videos. I'm off working on more!

Sunday, July 25, 2010

Video # 4 - nestabilities flowers

This video shows you what 1 additional fold and 3 sizes smaller will do to change a flower. You can truly play with these over and over - again, the possibilities are endless.


Direct link to the video is here

Check back tomorrow night and hopefully I've got some cards done to show you the final product. After all, I'm not just making videos - I'm making art!

Saturday, July 24, 2010

Video # 3 - nestabilities flowers

Could I have any more fun? I am so grateful to Kerry for all the video equipment and editing software he buys - I get his hand-me-downs to play with! LOL!

Tonight's flower is a little different because the way you fold it automatically gets you a built in background.


Direct link to this video is here

Give it a try and post back here and let me know your results!

Friday, July 23, 2010

Nestabilities Folded Flowers - Video 2

I think this is my favorite flower design -but I'm always working on new folds, so who knows?


Direct link to the video is here

I really think there are endless possibilities for folding your nestabilities into wonderful flowers. I have a few more ideas floating around in my head - wonder what we could do with the scalloped heart dies? Always more to try!

Thursday, July 22, 2010

All new Nestabilities folded flower tutorials (No. 1)

These are so much fun to make! I did several different designs over a year ago when I was demoing with After Midnight Stamps. And I'm finally getting around to doing tutorials on more of them.

Linda at After Midnight Stamps actually did the first video. I created the design and here's a link to her video:

AMStamps


The second design is HERE


So now on to the next 4 designs - here's the first one:


If the video doesn't show up, just click here

Here's hoping that by the 4th video I also have my card samples all done to share! So keep checking back each night just to see what's new!

Sunday, April 19, 2009

Fun from the show

Just a couple more samples tonight....using Labels 4, floral accents and flower bouquet miniabilities.  A new snowflake:

accented frame:

 dual accented label:


floral frame:


and we sold out of all of these dies! LOL!!! I like them so much I'm designing classes for San Diego with them - the possibilities are simply endless!!!

Feel free to order them from After Midnight Stamps - I highly recommend them!

Saturday, April 18, 2009

New nestabilities flower folds!

The show is over, so I'll share pics of the new flower folds. It will be a few days before I can do videos on how to do these....just let me know which one you'd like to learn first!

Pinwheel flower

Tipped circle:

Victorian bells

Petite squares

Snowballs


I think my fav is the tipped circle.  

Won't it be fun to learn how to do all of these???

Monday, April 13, 2009

Wings

Wow! This is going to be a jam-packed 2 hour class at the expo this weekend!!! Using 5 sheets of letter sized paper, I'll show you how to make this fun star book. But first......we'll do our cover using Spellbinders shapabilities and impressabilities. I'll show you how to use the dies as a brass stencil, how to cut them, how to emboss the impressabilities....

We'll be using the UCC -Ultimate Crafter's Companion to do our folds, scoring, and decorative line embossing:


and we'll use Nestabilities to do the aperture (window) cuts


Look close at this next photo - do you see the impressabilities down the sides? Yep - just cut them to meet your needs!

Rather fun to use shapes as openings.  And note the 4 corners - more scores and cuts.

And we'll be using Lucy McGoo stamps to adorn this cute little book this weekend:


When open - it makes such a fun star!


So from yesterday's prototype to today's finished project - I'll do one more variation some time tomorrow and get that posted.  

Life is a tad crazy at the moment as I fly out to San Diego a week from tomorrow.  I've spent a few hours today preparing blogs for Scrapbook Your Life! so go check out what I've been up to.  Really hard to keep up with 2 blogs this week!  But I think you'll just love how I am introducing my friend, Susan Mostek, to the store out there!    Off to post 2 new classes that I just finished up today for the store!   And then I think I need a nap!!!

Friday, January 30, 2009

teabag origami flowers

This is a make-n-take I designed for After Midnight Stamps. Totally fun and just so quick and easy to do!


Youtube link

AFter watching the video, I decided we don't need closeup photos. Hope you have fun with this one!!!

Tuesday, December 16, 2008

Think happy thoughts.....

Did you know that studies have proven that if you wake up in the morning and tell yourself that you are going to be happy today....that you will be?

And that every time you start to think of something sad, if you change that to a happy thought - then pretty soon all your thoughts will be happy ones?

And that if you are a happy thinking person.....you can infect those around you and they will become happy thinking people as well!

OK - let's give it a try!!! I absolutely love making slider cards. I learned this from Susan Mostek who is an amazing artist. She was over last week....and of course, we made more slider cards. This one is titled "think happy thoughts" - of course!!!


When you pull on the ribbon at the top, the top and bottom slide out. Notice now that the heart is different from in the first photos?


 That's because it's an aperture cut - made with my Spellbinders nestabilities heart.  Cut thru 3 layers of paper to create an opening.


And the slides are just black cardstock, with birds cut from the cardstock, and lots of white ink and white pen work .  Just love Ranger's white pen!!!


Did I threaten to do a tutorial on how to make this card?  Or shall I just make you all come take a class from me?  LOL!  OK, now remember - think happy thoughts!!!  Paper, birds, hearts, flourishes, swirls....yep, pretty happy with all that I think!!!

Sunday, November 30, 2008

I think I can.....

Remember the story about the train going up the hill and the phrase, "I think I can, I think I can, I think I can!"?

Well, I thought I could, I did, and I will never do it again! LOL! I saw a swing card in a store and really wanted to come home and make my own. I absolutely LOVE the results!!!


It's about 9" tall and took 2 days to hand cut all the images out of the paper.   Made a trifold and then diecut an opening using a spellbinders scalloped rectangle - that part was easy!


Diecut 2 letter "J"s to creae the hangers:


But it was the swing that got me!  And attaching the little toys to the swing.  And getting it so it would fold flat into a card....


I just kept repeating, "I think I can"......over and over!


And of course, me, I take it to the top, cutting little holes in the paper to line up with the windows

So when you look at it from the front, you can see thru the windows in the house on the back side!


And I gave the front a faux roof front to cover up the top.  The back is cut so that the card will stand up on it's own


All of my "I think I can"s tuned into one huge "I DID IT!!"

But I will never do this again unless I can simplify it.  Maybe one with a swing out of flowers?  Hmmm.....


Thursday, November 20, 2008

Mix n match Nesties

It's about time we mix and match our nesties! And do a little punch art while we're at it maybe.   This first card uses the new mega nestabilities curved rectangles (S5-005), Long Scalloped Rectangles, LG   (S4 143) , and Long Classic Rectangles, Large (S4-142), and a 1/16" drill punch.  Stamp is from Stamp of Excellence.  


For this one, I used the square scalloped die and the oval scalloped die.  Used a tiny flower punch and the drill punch.  Sort of gives it a look of lace.  


Your turn!  Get out your nesties and try layering different shapes - see what you can come up with!

Linda Hansen from After Midnight Stamps will be here tomorrow and we've scheduled a weekend to do nothing but play!  Isn't that fantastic?  So, of course, today I was busy experimenting with some of her products like Opals, Fantasy film, seaglass and more.  I think it's going to be an incredible 4 days!  She doesn't have to fly home til Monday evening.  So I expect a bit of shopping in there as well!!!

Tuesday, September 2, 2008

Beer Nesties!

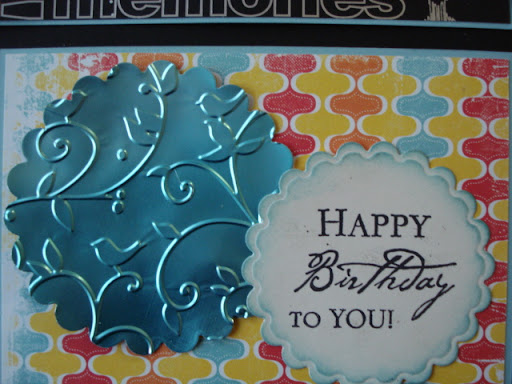
Are you more creative when you drink? LOL! Well, I'm teaching a beer can card class which is just so much fun.....you have to drink the beer to use the can!!! (OK, I'll also let you pour the beer down the sink!) But there is gorgeous, wonderful turquoise on the inside of Coors beer and it cuts and embosses in Spellbinders dies. But is also works wonders if you cut is as a nestie and then emboss it in a cuttlebug folder:


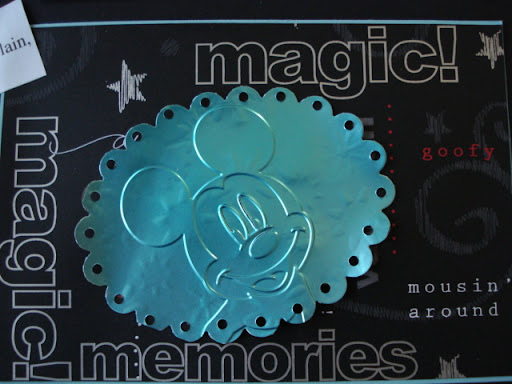
And what do you think about putting innocent little Mickey on a beer can? LOL! I used the Crop-a-dile to punch the holes in the scallops - works like a charm! Oh...I just had a thought! I should have dangled beads from the holes.....well, maybe next time!


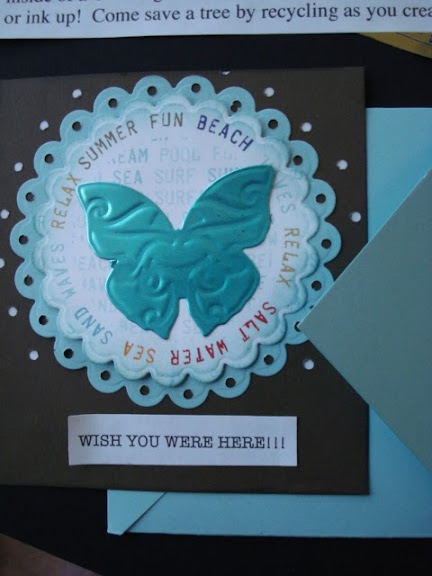
This is a beer can in the background, then paper cut with a nestie, then the butterfly cut and embossed in a beer can.


Who knew the nestabilities and beer cans went so well together? I don't drink beer, but it sure is fun handing a can to my friends and telling them they need to drink the beer for me so I can have the can!