Showing posts with label Talkabout Images. Show all posts

Wednesday, May 28, 2008

Altering your rubber stamps!

Oh! GASP! CUT UP my rubber stamps???? Well, maybe after you pick me up off the floor! I USED to be such a purist. My stamps had to be perfectly clean, in order, sitting on the shelves. Row after row after row. Even the wood was clean!

First there were a hundred stamps, then two hundred.....then a thousand...then two thousand....no, I'm not a stamper at all! But I can't resist a cute little stamp! And they literally took over my work space. So I unmounted all of them!

Once you unmount your stamps (it took 2 full weeks....and I saved 75% of my space) you get some kind of freedom. I can't really explain it....but it is a new kind of freedom - to PLAY!!!

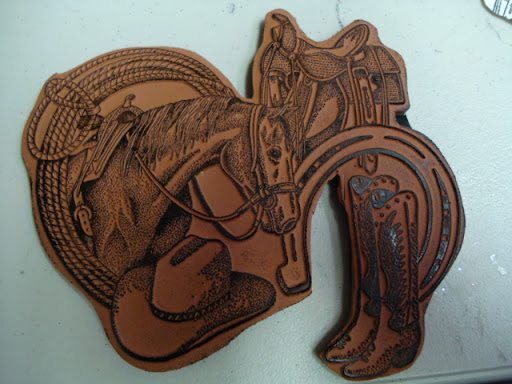
Example 1. I might use this stamp a handful of times as it is. A nice western collage.


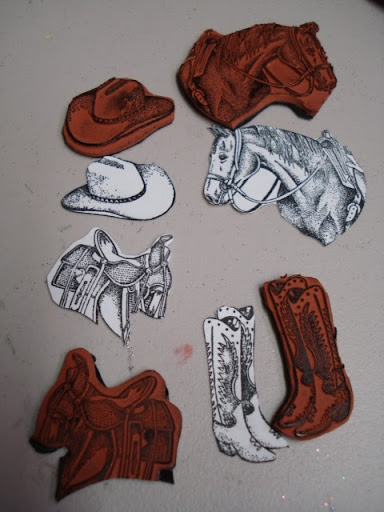
But I decided to cut the stamped image apart and use the individual elements from it. Now, I know, I can mask and stamp, but that seems a bit of work on a lazy day!


Dare I cut the actual stamp apart, I thought???


What freedom! Of course I did it! And now....do I count this as ONE stamp or as 4? LOL! I think I will get a whole lot more use out of it this way!


Example 2. I truly like this stamp. But I don't like it as a border. I wanted the sky to be open so it would "flow" upwards....not limit me to the size of this stamp.


So I whacked the top off!!! But look what happened! I absolutely LOVE this stamp now!!!
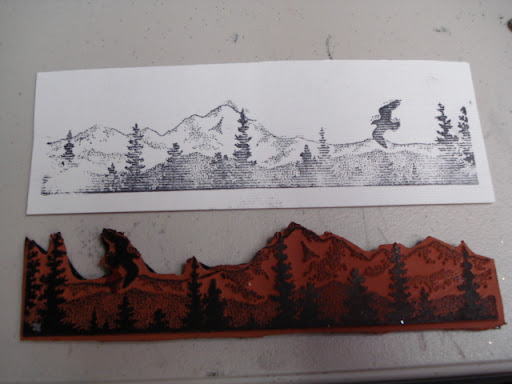


Ya gotta be BRAVE to do this!!!

Example 3. Do you ever have so much open space in a stamp that you get that "smudge" from the ink? Oh I do this all the time! And it can ruin a card in half a second!
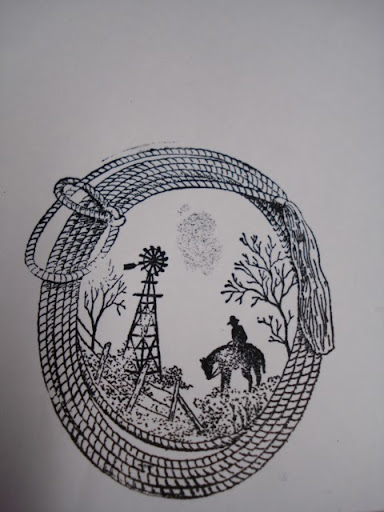


So, yes, I cut the inside out!


Don't worry, I left the inside perfect, so I can put it back and have the original image. But I can also stamp anything else in the center of the rope now!


All of the above stamps are from Talkabout Images. So reasonable I can buy 2 of each!

And next....the reverse. Why not take little stamps and create a collage out of them? One of my readers has been so generous and has sent me supplies for the local home school moms. This last batch had a lot of tiny little stamps in it, some dated back to 1996.
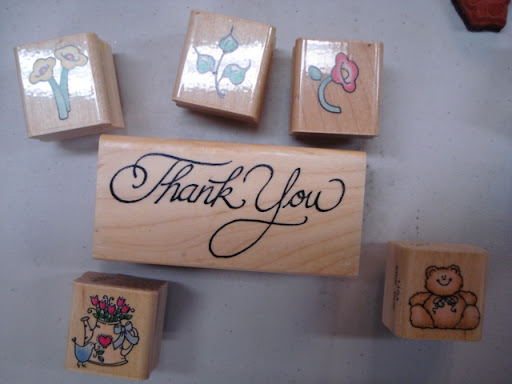

Because I unmounted them, I could then collage them back together to give an interesting new look to something over 12 years old!
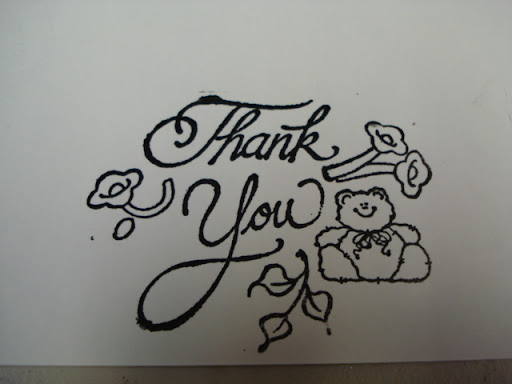


And yes, different brands as evidenced by different types of rubber:


Put together on Sunday International's thin mount:
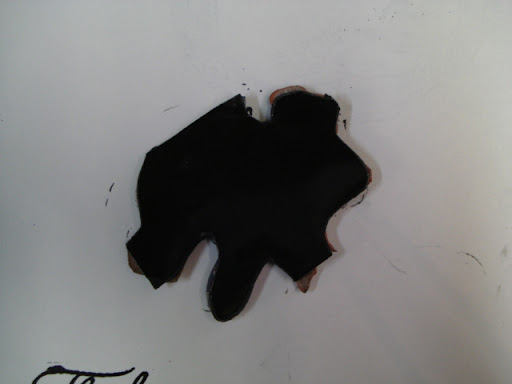


The stamp will go to the kids as a collage. But they can still cut it apart if they don't like what I did!

I know so many stampers who get bored with what they have. I say "UNMOUNT IT ALL! Cut it up! Make new collages! PLAY! PLAY! PLAY!"

And YES! I have unmounted ALL of my Stampin' Up sets! Even the ones on wheels! LOLOL!!!

After all, I've got to downsize this year...I've got to save on space! I've got to plan for hubby's retirement and a one level, 2 bedroom condo!

I'm just not sure I'm going to succeed!!! I do love stamps!!!

PS. If you are going to do this, use KIA or Tim Holtz scissors, and cut as close as you can to the image you want to preserve. I use EZMount to back them with and I'm still looking for my favorite acrylic block....but I do like several different brands.

Sunday, May 25, 2008

More Talk About Images

As promised yesterday, today's blog is all about the new stamp company and what I did with their stamps at the show yesterday. But first, I need to let you know my sources!

Accent Scrapbooking was at this show and on Friday, I picked up some clear acrylic tags from them to play with. Now you all know how much I love the acrylic word books I get at Scrapbook Your Life! - but I think you will also enjoy all the clear acrylic items this company has as well!

The blossoms and brads are all from Creative Impressions.

And I'm using Ranger's alcohol inks, jet black Archival ink, and new white pens. If you can't find the white pens near you, I still have some for sale here, just $3.00 each.

As you can see, a lot of white pen workon the top, stamped images on the bottom, I even used the white pen over on the mylar flowers. It was so much fun!


If you want to purchase any of these stams from Talk About Images, just email them at talkaboutimages@yahoo.com

The swirls are the only stamp not from them, it's from MSE.

Love the vibrant background colors in this one. You will see each came out a little different. And notice all the different flowers I attached to the top ofeach one....endless possibilities!


I liked this one so much I kept it! Most of the others were given to Accent Scrapbooking or Talk About Images as samples for future shows (or to put on the mouse trap at home!)


Here's on that Leesa did....no alcohol ink...just snowflake stamps. Really cute!


Which inspired me to do this one. Now...you will not find this stamp anywhere. One of these days, we are going to talk about ALTERING stamps! YIKES! Yep...we alter everything else that we do, so why not alter stamps? Terry, Lisa's hubby, gave me a big collage stamp that was marked bad and said, "here, cut this up!"....so that's just what I did! I cut out the elements from the stamp, then make a new collage that worked just fine on these little tags.


I know some of you would never even consider taking your stamps off their wood. Let alone cut them up! I know...have you picked yourself up off the floor yet? :o)

You will need to stare at this one. Half is yesterday's technique on the bottom and the other half is white pen on the top. Can you tell the divison line in the photos? Pretty 3D looking in real life!


Like how I can make the blossom on the top match any ink I put on the tag!


Look what a dark colored felt snowflake does to this blossom! Oh, forgot to mention..you won't find the dots on the stamps either...I added a lot of "embellishments" to the stamps!


Creative Impressions makes these really big brads that you can stamp on. Can you tell that I just played all day long???


Another altered stamp on the bottom border of this one. Are you starting to see the possibilities here?


Believe it or not, I didn't photo everything I did! I showed how to alter the color of the brads with alcohol ink...and there's one tag where we used the metallic inks and made a matching brad. I guess I was just too busy having fun to get a photo of everything!

I met so many really nice new friends at the show this weekend. And yet again, I met someone who knows somene else that I am good friends with....so that "less than 6 degrees" is still at work in my life!

Tomorrow....more things to do with blossoms.....and maybe we'll talk more about altering stamps! (GASP!) Right now, I best go tend to the weeds in the yard before the local HOA inspectors come knocking at my door! Just know, if it were up to me...the weeds could take over...I'd much rather play in my studio!

Saturday, May 24, 2008

Talk about images

OK, that's the name of a brand new stamp company that I worked for this weekend! And for those of you who attended the show today, here's the tutorial I promised.

Start with an acrylic tag. Well, of course, you can use any shape and as I showed today, you can use clear transparencies as well.


Any 3 colors of alcohol ink. I used Ranger, but Pinata inks will work as well.


Using felt on a wood block, apply ink to the "count of 2".


It will absorb into the felt and look a bit like this.


Dab it onto the acrylic until the acrylic is covered.


If you don't like what you get, clean it off with blending solution and start over. I like what we got for this one. This is called polished stones and I first learned this technique from Michelle Bodensteiner in the summer of 2004. Thanks Michelle!!!


Next, take a stamp. I'm using stamps from Talk About Images. If you want to purchase any of these stamps, feel free to email them. talkaboutimages@yahoo.com


Ink it up with permanent black ink. I like either Jet Black Archival ink, or black Stazon ink.


Ink right into the alcohol ink, same side.


Let dry just a little bit. You don't want wet ink for the next step, but if you wait too long, it won't work.


Using Viva paper towels (remember....Mom said "always use Viva!"), start wiping off the black ink.


It will wipe off all the black ink AND wipe off all of the alcohol ink where the image was stamped.


And the end result is a cool see-thru look!


Many of us learned this technique by mistake! We stamped something we didn't like, tried to rub it off....or accidentally rubbed off an image that we liked! Ranger University teaches this as "alcohol ink resist". Is it "resist" or is it "rub-off"? Either way, it's a truly fun technique! Just something else to do with your rubber stamps!

And then I added a snowflake flower to the top! Just too cute!


Stay tuned! Today is the technique. Tomorrow I will post pictures of all the different stamps I used to do this technique with at the show today. And then on Tuesday, I'll blog more about the flowers and how to make them. Just so many fun things to write about, but I worked a really long day today and right now....I think it's time for the heating pad! LOL!