Showing posts with label airbrush. Show all posts

Monday, November 18, 2013

Grandma's hankies


Remember the story of Hansel and Gretel?  How they left a trail of bread crumbs behind them?  Well, Grandma Moore left hankies wherever she went!  We always knew she had been there because we'd find a hanky!   I think she is the Grandma who taught me how to play. She rolled hankies up and turned them into babies in a cradle that you could swing.  She stitched bonnets on them and made little dolls out of them.  She was very poor, but her heart and her spirit were so rich.  She loved to sing hymns, she loved to praise God.


Grandma would have said, "Life is better when it's fun!"  She would have been amazed with my airbrush machine, copic markers.  And I know she would have tried them all out!!!


She made her own glue out of flour and water.  She would have just loved Stickles!  Strawberries, grapes and cherries were her dye.  Wonderful how God created "art" in the very beginning.


Next I'll have to make some more chipboard cups to put my hankies in.  Oh….life is just so much better when it's fun!!!

Wednesday, November 13, 2013

Copic techniques

As soon as I can (I'm traveling right now),  I hope to make a video showing how to do this with your copic markers, airbrush, and various inks (copic refills).  This is just so fun and easy.  And I do love the results.  Did a bit of experimenting with sealers and still not sure which one I like best.  In this first one, I sprayed too close to the lower right hand corner and you can see where it started to bleed out.  

I love the "grass" effect on the bottom as well.


This was sealed with a satin finish and I don't like that.  If you're working on tile, leave it glossy.  But it is something different, so I like it for that aspect.  :o)


These all started a white tiles.  I can just see my kitchen done in a series of images....wouldn't that be cool?  Or how about the bathroom?  Heck....I think this might just go down the hall!  I really like the results with this one and I've got about 15 more ideas to experiment with before we do the video.


Stencils are by DreamWeaver Stencils.....go stock up!!!  But here's my warning....she's starting to get dies to go with the stencils!!!  Check out the tree I used above.  You are going to want them all!!!


Wednesday, May 1, 2013

More ideas for your copic airbrush


On the third Thursday evening each month, we have a girls night out at the local scrapbook store.  I take a different topic each month and share ideas. I think using the copic airbrush system was probably the most fun night I've had!  Of course...it's "work" for me to come up with creative uses for some of the products I play with, but this was just plain fun!

I found this old wire basket at a thrift store - it was browns, greens, reds and oranges and I just do not like those colors at all.  I sprayed the entire thing white - using a 2 part primer and paint spray.  Then I "hit" spots with pink and mint copics and now I love how it looks!  I love how the airbrush fades to the white edges.   Yes....full of cards I've made in the past few months - great way to store them.


The airbrush is great for giving fresh color back to doll cheeks and skin....but not on this little cutie!  She's wearing a Bonnie Jean dress I picked up for $2.49.  I was able to trace the flower petal pattern, cut it out in white satin, airbrush the satin pink and make the matching flower to add to the hat.


Airbrushing fabric is so easy and can give added color to existing fabric (no you probably can't wash it but I'll never wash this dolls hat) or create matching fabric to any project your are working on.  What have you airbrushed lately?


Sunday, May 31, 2009

Back to "work"!

Don't you wish you had my "job"? LOLOL!!! Today I'm experimenting with Mr. Ellie Pooh paper and the cuttlebug and a variety of inks. I can't tell you how much I have loved this paper ever since I first saw it in 2005. Wow! Has it been that long???

Can you find 8 diecuts in the photo below?


How about in this photo?


OK, let me show them to you! Go back and see if you can find them now! When you put this paper in with other items...it sort of turns "real"!!! Now, be sure to read their story on their website (link above).

100% recycled, 75% pooh, 100% fun!!!


diecut with a cuttlebug die, then embossed in a variety of folders. OK, think outside the box when you think of a "folder" - the seahorse is using one of the hearts folders in a 2-part die.


And this piece of seagrass is using a folder form the make-a-flower set.  I used Colorbox queues to ink these  Sort of fun on the Pooh paper!

This paper is beyond amazing when it comes to diecutting and embossing!  Like cutting through butter!  And of course, this is one of my fav folders......I used copic markers on this one: 

Actually looks like puff paper to me:


And then I had to do my "standard" test using Ranger's distress inks....oh yumm!!!


Every now and then, a diecut comes out that I HAVE to have! This was one of them!  I just think this is way too cute!  For this one, I used copics in the air compressor.....totally love how the inks went on Pooh paper with air behind them!

Yep, even those stitches are diecuts!  Too cool!  And look how cute when it opens up!

This is the back of the numbers piece....just wanted to show that on each one of these, I'm using the cream, thin, Ellie Pooh Paper.    My favorite color is Robins Egg Blue, but I stock up on "white" because I just love how it inks up!

And finally, a real test...how does it work with Tim Holtz's new alcohol ink pens?  Just about perfect!!!


Wow! What a great way to return from vacation.....start playing the first day home!  Next up?  Turn these into cards of some kind?  No...I seriously have to start focusing on the
Metal Clay World Conference
....just 6 weeks away!  I have to teach 2 different classes - Diecutting & embossing Paper Type Metal Clay (and quilling) as well as a photography class and a pre-conference workshop!  YIKES!!!

Back to work!!!

Saturday, April 4, 2009

advanced airbrushing

Isn't it just amazing the versatility of my crafting knowledge? I even surprise myself. But I just pull from my past and bring it forward to the present. Ah! The benefits of age and experience!!!

This piece is made from white paper. So this class will teach you how to use a variety of masks to create airbrushed backgrounds.


Plus...look at this. I've turned an acrylic journal into deocrative clear stamp storage....and even colored the clear stamps to match!!! How fun is that???


Now, go back and look at that first photo. Did you not even notice the miniature starfish (3D) have been airbrushed?

I'll show how to use a variety of items as masks, including nestabilities dies, frisket, masking paper......


diecuts, negative space, torn paper - and show you a clever way to store your paper masks! And as a bonus, there's a segment on using undu - oh, I do love that stuff! Hmmm...looks like someone undid one of my sandals! LOL!!!


If you like airbrushing with copics and live in the San Diego area, contact Scrapbook Your Life! for more details. This is going to be a fun class....and it's limited to just 12 students. And I'll only teach it once!

Tuesday, March 24, 2009

Airbrush experiments

You know, there are moments when I get all caught up in my art and I forget why I first started this blog.  I was chatting with a friend (Hi Vickie!) tonight and she reminded me that every now and then, I should just talk about what's going on in my life!

So, what's going on in my life?  ART!  LOLOL!  I am in a creating blitz this week designing classes for San Diego.  They may never get done as I seem to be going quite slow...until today.  Susan come over to play and all of a sudden....all of the ideas were right here.  I think I finished up 3 classes today. Perhaps what I need is a full time assistant!

If you've never taken the time to read my first week of posts, you'll never know why I started this blog.  I just reread them and realized.....I was probably the first or one of the first "inchie" designers with my layout that included 49 one-inch photos of all bad hair days throughout my life!  LOL!!!  50 years of bad hair.  It's just who I am!

And can you believe that I grew up without a TV?  Imagine that!  We have a TV in every room in the house now.  But funny thing, Kerry is off to LA this week and I don't think I've turned the TV on once.  I really believe that when you grow up without it....it's quite easy to live without it.  Most of my closest friends know that about me and they know to call me when something happens (like 911) and tell me to turn on the TV.  LOL!!!

I promise to start adding a bit more about what's going on in my personal life....but honestly, this week...it's truly all art!  When the "cat's" away.....all I'm going to do is play!!!

I'm brushing up on my metal repousse and this was my first little sample. It's a palm tree  wrapped around a candle and my base was a cricut diecut. Pretty cool.

but look what happens when you take the copic airbrush to pewter - you can literally create your own piece of colored metal.  I LOVE this!!!

For this one, I used a rubber stamp.  I thought it looked a bit like seaweed!  LOL!

This piece has some great depth to it as well:

I finished this one off - I think it could be a pendant....but I also think it would look cute on a card.  Not sure what I'll do with it....but next, I want to do a couple of seashells!


No, next I want to airbrush on friendly plastic!  No.....

OK, I think that list is endless!!! Who knows what I'll do next!  It's what makes being an artist so much fun!!!

Sunday, February 15, 2009

Jammies only

Sunday. February 15. Jammies only.

.....when it's cold outside, it's ok to stay in your jammies all day long
....when you wake up hurting - it's ok to stay in your jammies all day long
....when there's no reason at all....it's ok to stay in your jammies all day long!

Kerry and I both voted to stay in our jammies all day long today! How fun is that?

Usually, I'm sick, have the flu, something has to be wrong to keep me in my jammies all day long.

Not today - it was Jammies Only Day at out house!!!

No cooking allowed, either. We are doing well with leftovers.

No laundry, fixing, fussing. A true "do nothing" day.

OK, but I did make a card. And play with the cricut. And rearrange a closet.

But I swear, I did them all in my jammies!!! LOL!!!

Here's the card....

Now, a cricut and an airbrush.....it just can't get any easier!!!

An mixing with with the airbrushed diecuts - how fun!

Green, pink and yellow copics with a touch of brown and red

And who says you can't alter a diecut?  I cut the "I" off the top of the heart.

Don't be afraid to mix and match what you do!


I wrote this poem for the inside:

You inspire love and fill my heart...
you allow me time to create art!

My feet can dance, my soul can live
My hands can write....of this love you give.

You inspire me in all these things
You are my angel - my hidden wings.

OK, yes, he loved it! :o)

Every now and then, give yourself a "jammies only" day!  It's been great!!!

Friday, September 26, 2008

And in honor of my blogging birthday.....

I have had such a fun week! My dear friend Susan Mostek came to play one day. Oh! Did we have fun! She showed me how to make her fabulous "pull cards" and if you want to learn the mechanics of these, you can take one of her upcoming classes at Stamping Details in Poway, CA. Or watch for classes at Your Crop Shop.com.

Susan is such an inspiration to me. Not only is her art beyond amazing....she is a giggler. And once she starts to giggle (or sometimes even just the thought that she might start to giggle) sends me into a fit of laughter. Oh! It is just sooooo good to laugh!!! And when you can spend a day laughing and giggling with someone who laughs and giggles right back - well - what can I say? Wonderful! Absolutely wonderful!

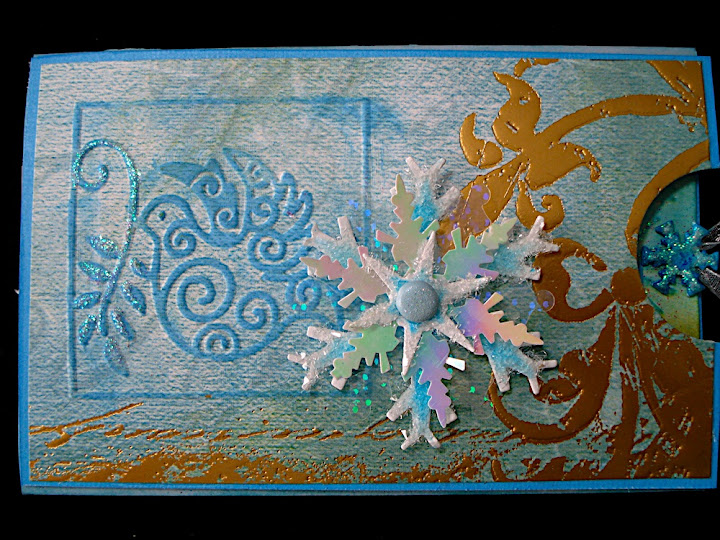
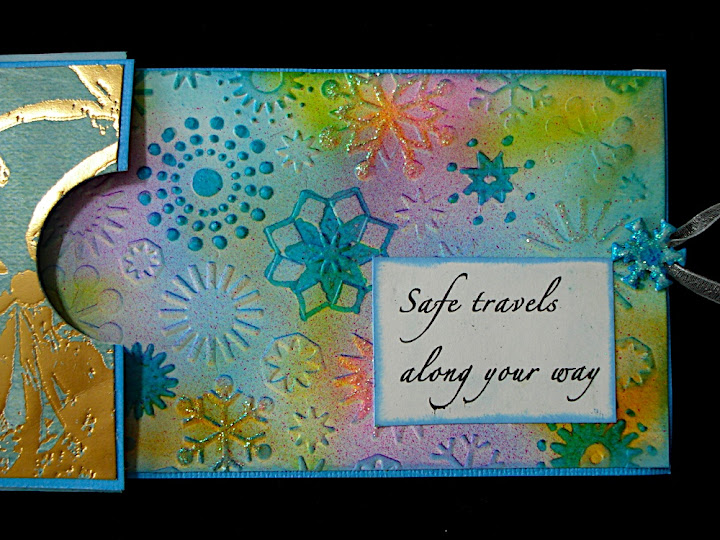
Susan is also a very patient teacher - which is quite good when it comes to me! After showing me how to make the card, I decided to add a few elements to mine. I used a new cuttlebug embossing folder to emboss the dove. Next I combined parts of Spellbinders snowflake die covered in Diamond dust with snowflakes from Creative Impressions. They really do glitter and shimmer in real life!


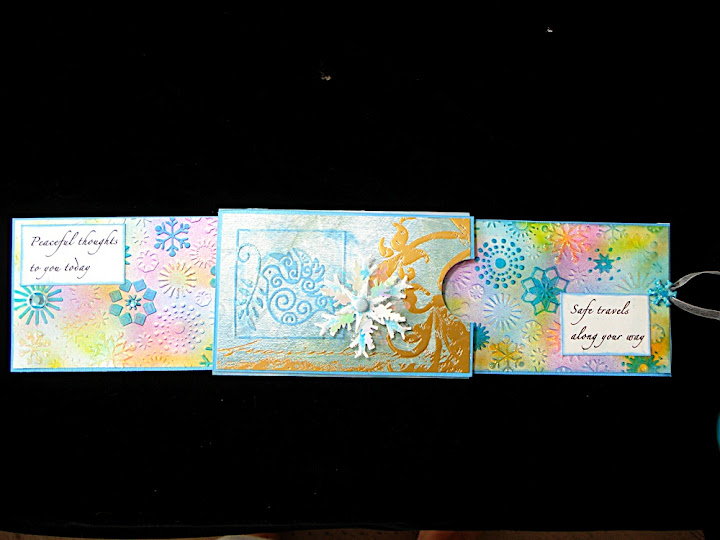
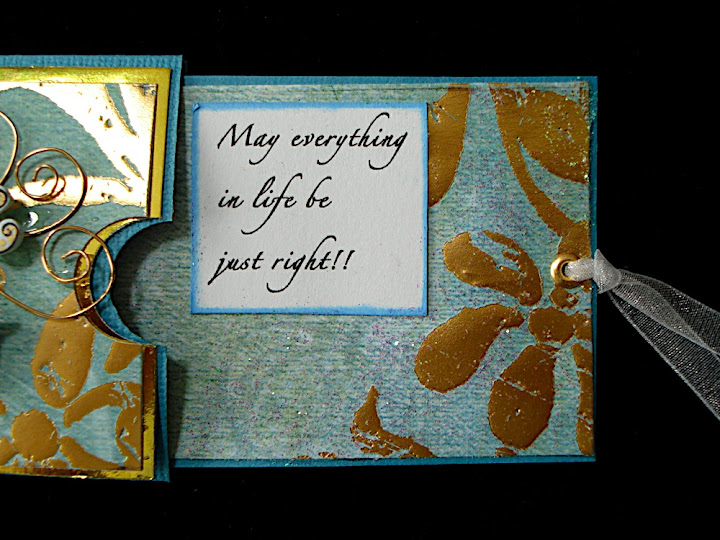
When you pull on the ribbon to the right, both the right and left inside cards pull out. How fun is this?


Yep, I've moved away from seashells and jewelry and back to airbrushing white cardstock that I ran through another cuttlebug embossing folder. Then used the copic marker to color a few of the snowflakes. Added glitter to a few and then added my sentiments which were printed on cardstock.


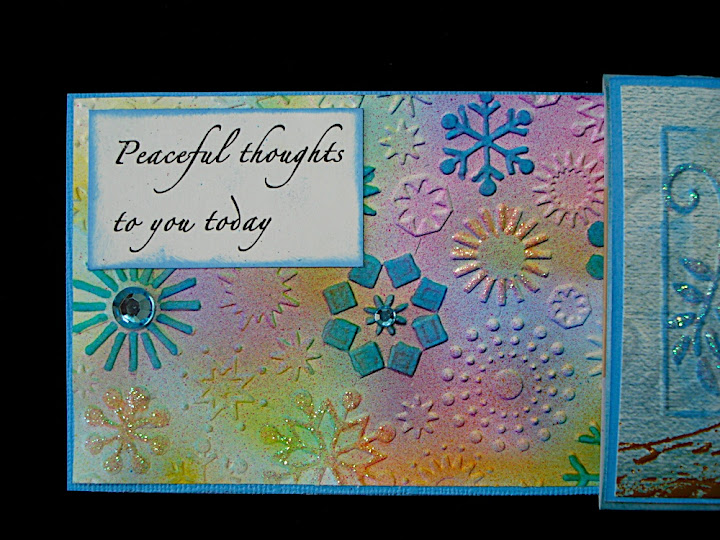
And added a few rhinestones. The snowflake brad is from Creative Impressions and I used the airbrush to get matching colors and then added glitter on top of that. All closed up, this card measures about 5 1/2" x 3 1/2" and when you open it, it goes to almost 14" long!


After Susan went home, I decided to try and come up with the measurements to do this as an ATC sized card so I could put it in my ATC rounder with all my other Creative Technique Cards. Oh! How fun!!! I simply used leftover scraps of paper for this one. The angel is done in white shrink plastic that I colored with watercolor pencils and 14K gold krylon pen. Lots of gold metallic on this piece with turquoise rhinestones.


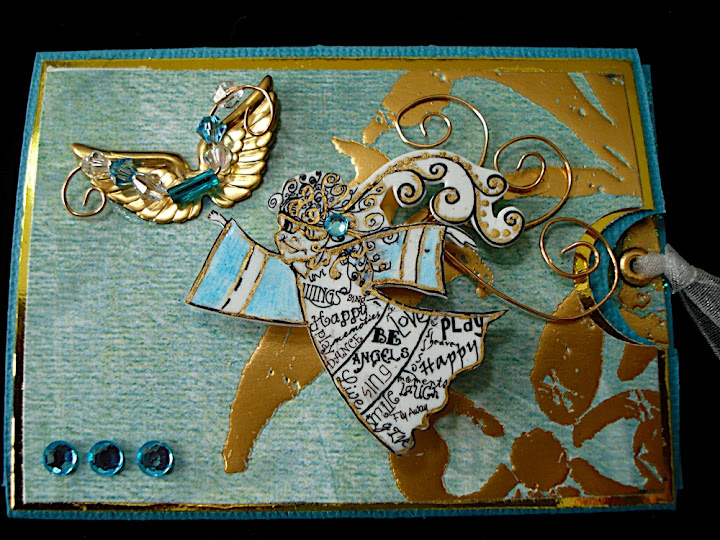
So, this is just 3.5" x 2.5" and when you pull it out, the length is 8.5". But I wanted to show here that you can pull it out just a little, not all the way, and get yet a different look:


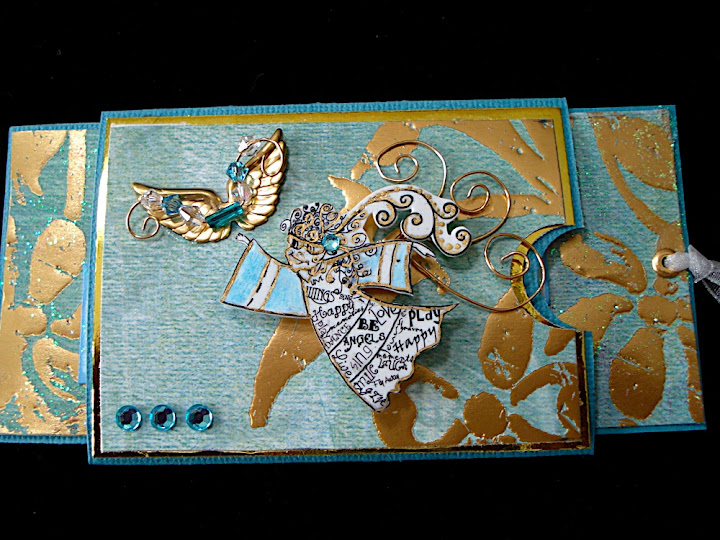
Don't you just love this paper? Gold embossed designs, such a good variety of cuts from it!


Let your imagination take flight.....


May everything in life be just right!!!


What a perfect sentiment to start my second year of blogging with! And truly, my wish for each of you in the year to come!!!

Thursday, September 25, 2008

Have I gone to far?

Having run out of seashells to airbrush, I took a look around the house and there it was....pieces of metal clay jewelry that need a touch of color!


Airbrush the color on by masking off the areas where you don't want the color to hit. So easy! And I sealed it with super seal. Love that stuff!


Not even my jewelry is safe! LOL! This piece was made with Art Clay Silver and my Lucy McGoo stamps. Now I need to go buy something new to wear this with!!!

Hmmmm....maybe Kerry would prefer that I simply airbrush his shirts!!!

Wednesday, September 24, 2008

Airbrush insanity!

I think I may have gone a bit insane with the airbrush! Trying to "master" my hand with the copics - it's just too much fun!


Again, these are shells we picked up on the beach in Mexico. Extremely bleached out. No color at all. So the airbrush went on quite easily.


I was actually going to throw this shell away a few years ago it was so ugly. I'm sure glad I didn't!


I just love how the colors blend together, and how you can "force" a border or pattern.


I know I still need lots of practice - we're going on a cruise in a few weeks - guess what I'll be looking for! LOL!!!


I'm all out of seashells, so I guess Kerry's closet is next! :o)