But you know, she didn't get here til about 2:30 today and by the time we got home from the airport....and unpacked....and had some wine.....and looked at the studio....and moved her studio into my studio....
NOTHING got done!!!
However, in anticipation of all the designing and creating that's going on this week.....and the videos we are going to make...I thought I'd put a link here to ALL 17 of my youtube videos to date. Just click below:
YouTube Video link
And have fun if you have missed some of these. Bookmark the site, or subscribe to my videos so you don't miss a single thing.
And look at all the product I've used so far.....such enabling!!!
Amaco, After Midnight Stamps, Scraperdashery, Spellbinders, Quickutz, Sizzix, Provo Craft, Lucy McGoo, Luminarte, Ranger...
and I did my first video just 2 months ago! Imagine where we are headed!!!!!

Showing posts with label Scrapperdashery. Show all posts
Showing posts with label Scrapperdashery. Show all posts
Tuesday, February 24, 2009


Saturday, November 8, 2008
Alcohol ink - outside the box - final
With the backgrounds already done, it took about 20 minutes to make these 4 quick cards using stamps, markers and scraps of paper.

Mostly simple little cards


Inkadinkadoo, B Line Designs, and this one is just a printed sentiment:

And I have enough backgrounds still left to make up 20 more cards. Such fun - alcohol inks!!
Monday, April 7, 2008
Nested Hearts!

OK, first, let's number these dies. Let's say that # 1 is the smallest die and # 6 is the largest die. And on my blog...we'll start numbering each of the nestabilities in this manner.
So, here you have the nested heart dies, # 1 - # 6:

For this one, I'm going to use the # 5 scalloped heart (next to the largest) and the # 4 classic heart dies. Cut your paper 7 1/2" x 4 1/2" and fold it in half. Place the fold just beneath the upper arches of the scalloped heart like this and cut:

Next, place a piece of printer magnet paper (available at Office Depot or Walmart) on the white emboss mat. Then place the classic die inside the heart die.

Place the folded paper on top of this:

then place the tan emboss mat and white cut mat on top of that.
When you are done, the next steip is to ink it. The classic heart will emboss inside of the scalloped heart while the scalloped edges emboss:

Take a 1/16" hole punch and punch 2 holes on each side of the top, half way in:

Stamp your sentiments and flourishes, then outline with Ranger's new white pen and add lots of dots! Once again, I'm using all Lucy McGoo Stamps here. If you can't find them...I think I can send you a link! LOL!

Thread lace ribbon through the top, up through a bead.....

And the finished project will flip open. I'm using Scrapperdashery's 2-sided paper for all of these.

Here's a smaller version using the # 4 scallop and the # 2 classic:

As you can imagine, you could also do the classic on the outisde and the scallop on the inside. Once again, the possibilities are endless....just more reasons to play!
If you can't find Ranger's new white pens, email me!
Wednesday, March 26, 2008
More nesting nestabilities
My friend, Ron, said he didn't have any of the round scalloped nestabilities....so I thought I'd show him how to use a square geometric die....or even a square punch...and do some nested nestabilities.

Fold the paper on the diagonal

And then fold both tips up to the center top

so it looks like this
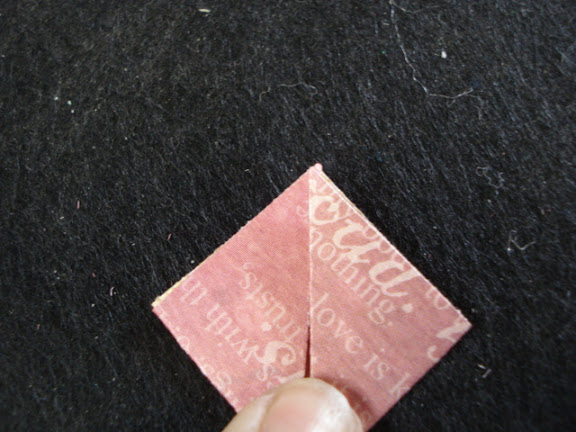
Next, fold the tip in half...back out to the side.

on both sides like this:

Then open up that fold that you just made

and fold them down flat like this:

Finally, pinch them together in the center:

You can do 4 of them to get a flower like this:

You can also fold the ends back over and roll it into a circle, put 4 together to have a flower like this:

So Ron, you don't need a circle die....there are tons of tea bag folds that you can do and just play with them..unfold them, pop them up, shape them....make great flowers out of them!
Now....who has the heart nestabilies? I'm sure we can make great flowers out of them. It's the Paisley nestabilities that I'm a bit worried about!!!

Fold the paper on the diagonal

And then fold both tips up to the center top

so it looks like this
Next, fold the tip in half...back out to the side.

on both sides like this:

Then open up that fold that you just made

and fold them down flat like this:

Finally, pinch them together in the center:

You can do 4 of them to get a flower like this:

You can also fold the ends back over and roll it into a circle, put 4 together to have a flower like this:

So Ron, you don't need a circle die....there are tons of tea bag folds that you can do and just play with them..unfold them, pop them up, shape them....make great flowers out of them!
Now....who has the heart nestabilies? I'm sure we can make great flowers out of them. It's the Paisley nestabilities that I'm a bit worried about!!!
Monday, March 24, 2008
Layering dies, stepping it up!
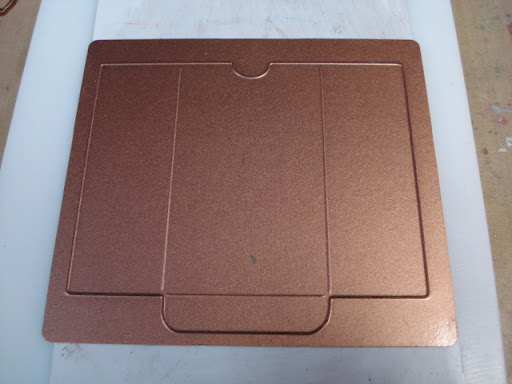
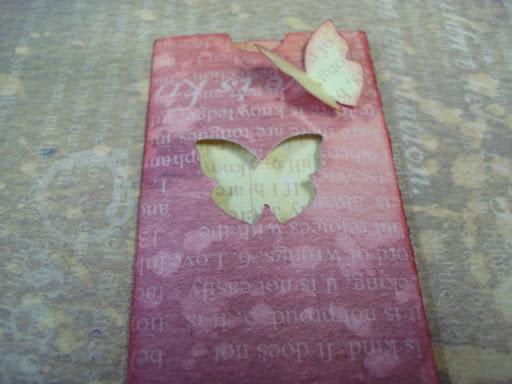
OK, are you ready? Stepping up yesterday's blog. And I'm using the library pocket die. I actually love this die and use it quite a bit.
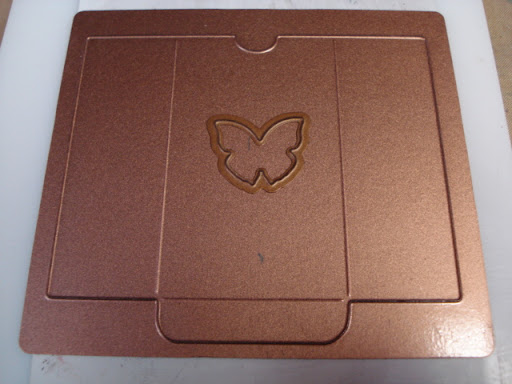
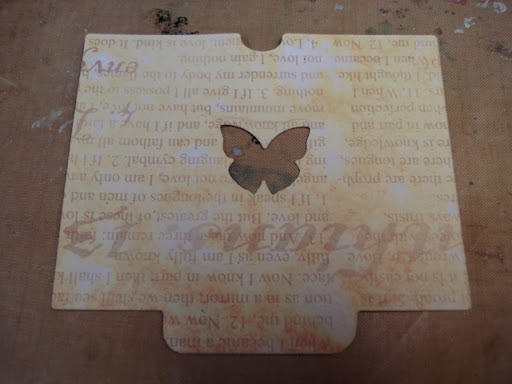
I've layered the little butterfly from Flying Fantasies on top of it. Remember, both cut sides are up.
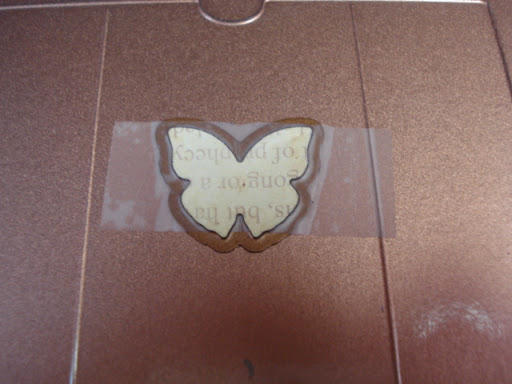
There is always a chance that a die will move, so just put a piece a tape across it. Don't worry, the die will cut right through the tape.
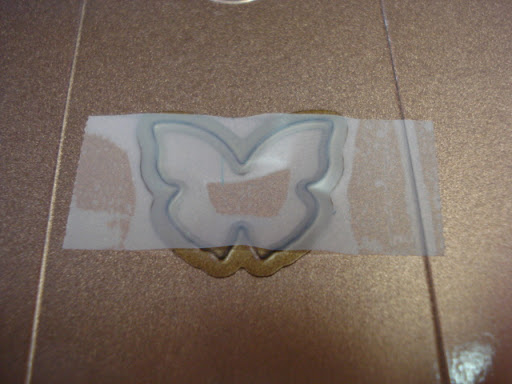
The pocket will cut and the butterfly will cut out.
Just pull the tape off and pick up the butterfly
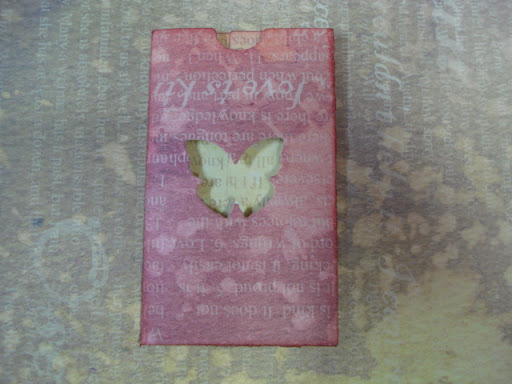
Fold your pocket:
Ink the edges and then adhere the little cut out butterfly to the corner of the tag.
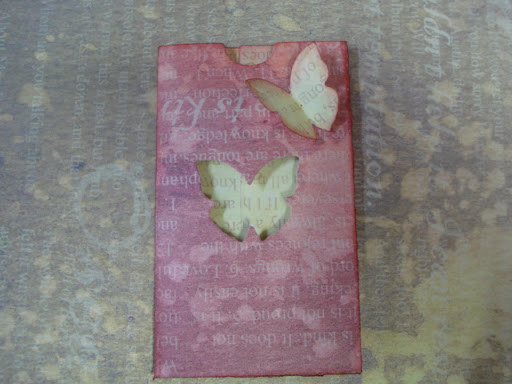
Very dimensional:
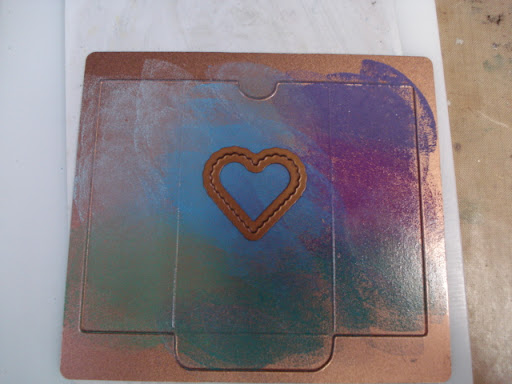
Sort of a recap of yesterday, but now to step it up. I'm going to use Colorbox Fluid Chalks:
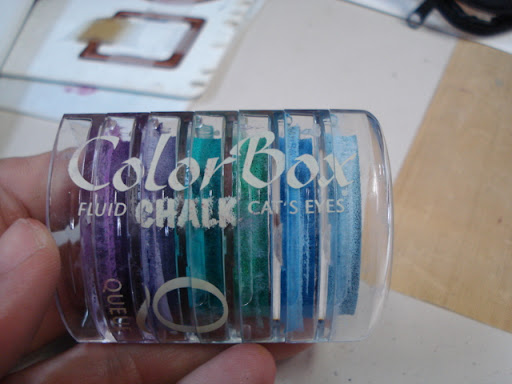
Apply the fluid chalk directly to the cut side of the die. In random patterns. Know that the colors that are on the top are the first that will be applied to the paper when the paper touches the ink.
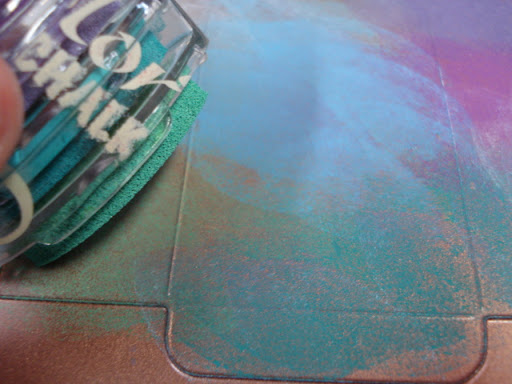
Ink the entire die.
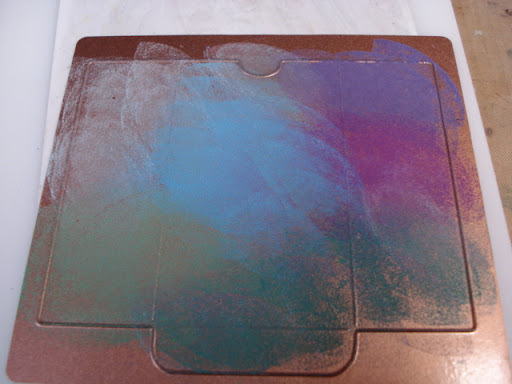
Place the little die in the center. I'm using a die from the heart nestabilities for this.
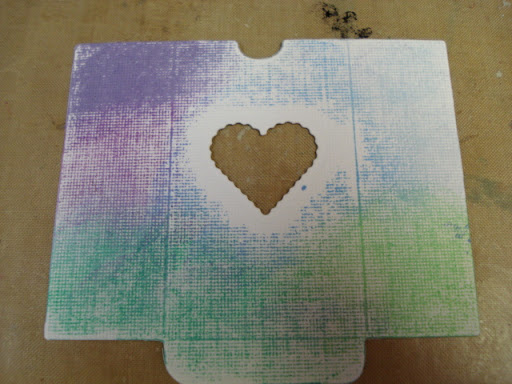
When you run it through and die cut, this is what you will get. I sort of like the wide area of white around the heart.
Next, ink the inside center side tabs of the die cut:

So when you fold the pocket up, the background inside the heart is inked.

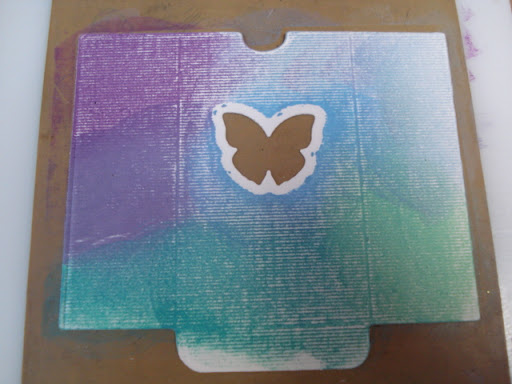
Now remember, so far, I have only die cut this. If you go ahead and emboss it, you get much more ink on the paper and a more distinct pattern around the butterfly:
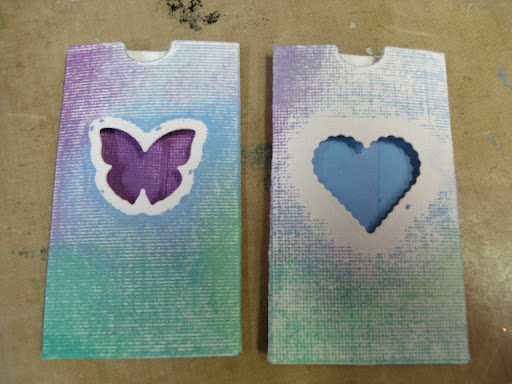
Here are the 2 pocekts side by side. The butterfly was cut and embossed. The heart was only cut...not emobssed.
So, think about the possibilities of this. You could stamp any image on the die itself and then it would reverse the image onto the library pocket. Swirls would be easy and fun. You could stamp the colored ink, then stamp a black inked swirl. And it might look fun if the die moved a little and sort of smooshed the stamp.
I think any ink would work. I picked fluid chalks because they stay wet a long time. But the really cool thing is that you just let them dry on the die...they turn to chalk and you simply wipe them off with a tissue.
And what if you used watercolor paper, and then took a wet brush and blended the ink?
Fun, quick, easy....and a great way to bring an old die back to life. I think I've had this library pocket die for almost 3 years now! My...how time flies!!! This direct-to-die inking technique, also called "reverse stenciling" was inspired by my good friend Holly Craft (oh! how I wish I had "craft" as my last name!!!) and she was inspired by her fellow Spellbinders design team member Michelle Klomp, who brayered ink directly onto the die. Just something else for you to give a try!
I've layered the little butterfly from Flying Fantasies on top of it. Remember, both cut sides are up.
There is always a chance that a die will move, so just put a piece a tape across it. Don't worry, the die will cut right through the tape.
The pocket will cut and the butterfly will cut out.
Just pull the tape off and pick up the butterfly
Fold your pocket:
Ink the edges and then adhere the little cut out butterfly to the corner of the tag.
Very dimensional:
Sort of a recap of yesterday, but now to step it up. I'm going to use Colorbox Fluid Chalks:
Apply the fluid chalk directly to the cut side of the die. In random patterns. Know that the colors that are on the top are the first that will be applied to the paper when the paper touches the ink.
Ink the entire die.
Place the little die in the center. I'm using a die from the heart nestabilities for this.
When you run it through and die cut, this is what you will get. I sort of like the wide area of white around the heart.
Next, ink the inside center side tabs of the die cut:

So when you fold the pocket up, the background inside the heart is inked.

Now remember, so far, I have only die cut this. If you go ahead and emboss it, you get much more ink on the paper and a more distinct pattern around the butterfly:
Here are the 2 pocekts side by side. The butterfly was cut and embossed. The heart was only cut...not emobssed.
So, think about the possibilities of this. You could stamp any image on the die itself and then it would reverse the image onto the library pocket. Swirls would be easy and fun. You could stamp the colored ink, then stamp a black inked swirl. And it might look fun if the die moved a little and sort of smooshed the stamp.
I think any ink would work. I picked fluid chalks because they stay wet a long time. But the really cool thing is that you just let them dry on the die...they turn to chalk and you simply wipe them off with a tissue.
And what if you used watercolor paper, and then took a wet brush and blended the ink?
Fun, quick, easy....and a great way to bring an old die back to life. I think I've had this library pocket die for almost 3 years now! My...how time flies!!! This direct-to-die inking technique, also called "reverse stenciling" was inspired by my good friend Holly Craft (oh! how I wish I had "craft" as my last name!!!) and she was inspired by her fellow Spellbinders design team member Michelle Klomp, who brayered ink directly onto the die. Just something else for you to give a try!
Sunday, March 23, 2008
Layering dies, can it be done?
Some days I think only the tip of what you can do with die cuts has been discovered. So here's something you can try...layer up your dies! Yes...literally stack them on top of each other like this. I used the Seed packet die and a little square embellishment from the Sweet Garden edgeability die.

Do not emboss, just die cut. It's the standard sandwich in the Wizard. It won't hurt a thing. Just remember to put both cut edges facing up!

A sweet way to showcase a photo and have a little embellishment left over. :o)

You can do this with any combination of dies. Here, I'm layering one of the stars form the star nestability die with the seed packet:

Just cuts so perfectly!

Again, I could put a photo in here, add a tag, just about anything. The key...cut, do not emboss. As long as you don't emboss, the word "seeds" will not show up and you can have new options for an older die!

So stay tuned. Tomorrow, I plan to kick this technique up a level! Bet you are wondering what I could do next?

Do not emboss, just die cut. It's the standard sandwich in the Wizard. It won't hurt a thing. Just remember to put both cut edges facing up!

A sweet way to showcase a photo and have a little embellishment left over. :o)

You can do this with any combination of dies. Here, I'm layering one of the stars form the star nestability die with the seed packet:

Just cuts so perfectly!

Again, I could put a photo in here, add a tag, just about anything. The key...cut, do not emboss. As long as you don't emboss, the word "seeds" will not show up and you can have new options for an older die!

So stay tuned. Tomorrow, I plan to kick this technique up a level! Bet you are wondering what I could do next?
Sunday, March 16, 2008
Nesting nestabilities
I'm at my in-laws all week and rather bored in the evenings.....so lots of tutorials!!! During the day, I visit my friend Jody, who happens to live in Kingman AZ. Today, she showed me a z-fold flower that she had made. I decided that it could be done with a Spellbinders Nestability die....or a Quickutz Cookie cutter die. Any circle die about 2" in diameter will work.
Cut out 8 circles. Ink all the edges. Fold in half and ink the fold.
My first lesson was that you do NOT want to fold them like this (half way through a scallop)

You want to make the fold between the scallops:

Next, count up 3 scallops from the left and make a 90 degree fold. I used my bone folder to get a good fold.

Starting at the bottom, fold up 45 degrees to the left. What was on the bottom top should now be on the left side, top.

Next, take that long bottom side and fold it behind everything on a 45 degree angle:

Use double sided paper. Did I mention that? This is Scrapperdashery's new line and I just love it. I reversed the paper with every other diecut.

And then slide them together at the center:

I used a Sizzix tag die, some Lucy McGoo stamps, and attached 3 Swarovski crystals.

There is a bit of depth to this, but I just absolutely love how it came out.

Thanks Jody for showing me how to make these flowers!!!
This just might have to be the make-n-take at the show in San Diego!! What do you think? Would you sit in the After Midnight Stamps booth and make one of these to take home with you? Let me know!!!
Cut out 8 circles. Ink all the edges. Fold in half and ink the fold.
My first lesson was that you do NOT want to fold them like this (half way through a scallop)

You want to make the fold between the scallops:

Next, count up 3 scallops from the left and make a 90 degree fold. I used my bone folder to get a good fold.

Starting at the bottom, fold up 45 degrees to the left. What was on the bottom top should now be on the left side, top.

Next, take that long bottom side and fold it behind everything on a 45 degree angle:

Use double sided paper. Did I mention that? This is Scrapperdashery's new line and I just love it. I reversed the paper with every other diecut.

And then slide them together at the center:

I used a Sizzix tag die, some Lucy McGoo stamps, and attached 3 Swarovski crystals.

There is a bit of depth to this, but I just absolutely love how it came out.

Thanks Jody for showing me how to make these flowers!!!
This just might have to be the make-n-take at the show in San Diego!! What do you think? Would you sit in the After Midnight Stamps booth and make one of these to take home with you? Let me know!!!
Subscribe to:
Posts (Atom)