Showing posts with label scrapbooking. Show all posts

Monday, December 3, 2018

The iKross for my Workbox3.0

I just got an iKross and installed it in my Workbox3.0.  I absolutely love it.  It frees up my workspace and holds my iPad at eye level.  I think it's perfect!


It folds up almost flat against the workbox.  I centered it right under the middle drawer.

 This is the slot that the stand goes in.  It came with 2 holders and I bought 2 extra as I plan to mount one next to my bed, one under a kitchen cabinet.....maybe even on beside the bath tub!  LOL!


You can take the stand out of the holder and use it on your table, or desk, or anywhere.


And it will pull out quit aways from the workbox shelves just in case you want to watch a video up close.  I think I can also use this to create youtube videos.....if I ever get enough time.


It's going to be perfect for watching how-to videos or Hallmark movies on youtube while I get crafty.


Here's a link to the one I bought on Amazon....but there are other versions as well.  Just google i-pad 12" wall holder.

I also cut a Joann's self-healing cutting pad to the size of my workspace just for added protection.

To the left, you will see that I've attached a Tonic Studio's Table Tidy with the 2-pocket Tidy and the Tiny Tidy.   Just some more table height storage.....must keep my workspace clear!


Very happy with today's addition to my Workbox3.0.

To see my scrapmabob makeover click here.

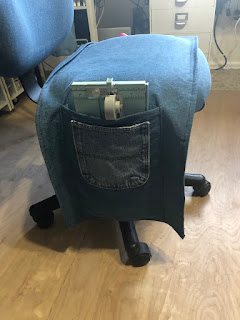
To see my new workbox3.0 chair with heating pad pocket and storage saddle, click here.

To see my review of the workbox3.0, click here.

To see my upcycled denim scrapbook caddy, click here.

To see my paint bucket, click here.  These last 2 items are on the floor and hold tools for everything I need.  Altered to go with my denim themed accessories for my workbox.

Hope you've had a crafty day!


Friday, November 30, 2018

The chair for the workbox3.0


It has been quite some time since I've been office chair shopping.  I decided on this one as it was half off and the arms will lift up.  Bonus - it rocks!  LOL!


But get a load of the back of it!  That is just beyond wierd!


Brand new....but I recovered the arms and seat in denim and made a slip cover to go over the back.  Look closely and you will see a cord coming out the right hand side.  That huge pocket across the front has a heating pad stuck down in it!  There are slits on either side, so I can use an outlet no matter which side it's on.   Added bonus, the heating is in the perfect spot for my back.  Second bonus - the arms flip up so it fits under any height table.


The back side has 2 pockets that hold the controller and the rest of the cord.  It tucks down behind that weird back frame.  I've been trying it out and I really like it.  Comfy enough to work from.....reclines enough to make it great for watching TV.


I also have a couple Walmart student chairs that I recovered in denim.   My sisters need chairs when they come to play.


One of them has it's own heating pad cover just like the top one.  But it also  a "saddle bag" on the seat and I can keep a tape runner down in one of the gigantic pockets and my ATG gun on the other side.


It is so much fun customizing things to make them work better for what you need!  What have you altered lately to meet your needs?


Thursday, January 3, 2013

People always ask where my inspiration comes from.  Sometimes it's the paper.  Sometimes it's the embellishments.  Today, it was the photo!  Kerry's oldest granddaughter.  I saw the flowers on her sweater and that was my inspiration!


I wanted to make a store sample for Design U'R Memories and it just all fit together.  I love the crocheted flowers.  Paper flowers on top of them.  Vintage velvet flowers on top of them.  Patterned paper as the photo mat.

The most fun thing was the letter kit that I used for the title.  It did not have a "c" for cute.  I think it had letters for journey and adore.  No "c" in the lot.  So I made one using the back of another letter.  Just fun to challenge myself for different things to do with "kits".  Just a dusting of distress ink on the edges.  Quick and fast layout.

So for the BRBs who want to know if I ever do layouts....yeah, once in awhile!!!

Tuesday, August 21, 2012

When we moved mom, my sister took the pocket from her front door at The Village and put it on her bedroom door in her house.  So I had to make a new LO for her door.


There was a free crop at the local scrapbook store this weekend and I decided to pop in there Sunday afternoon and just "play".  Lovely ladies.  So sweet!  I found the papers and the "cut work" dressforms and roses in the store.  These are very metallic - but don't show up in the photos.  3 layers, each layer a little differently cut and you stack them up, so lots of dimension to this page.


My friend, Kathy, gave me the bird bath, birds and bird cages, lace and bling.  I decided to try and incorporate them all into the page.


You have to look close to see that the lace holding up the bird cage is wrapped around the end of the hand-cut corner embellishment.  I wanted mom to have lots to look at and feel.


I even hand cut some self coloring paper into the shape of a dressform.  Another product I picked up at the local store.


I'd say this is breaking all the scrapbook rules and more like making a 12x12 sized card.  Quite fun.  Mostly just cut paper around an existing printed design to make the corners and borders.  OH, lots of stickles on the roses and other embellishments make the page just "pop" in real life.

Thanks to Design U'r Memories for a fun crop day!!!