Showing posts with label copics. Show all posts

Wednesday, June 7, 2017

How do you store your copics?

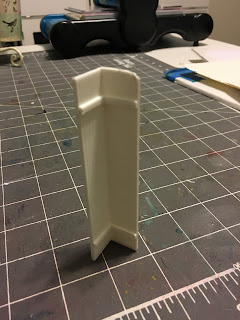
We have a 3D printer and this past week - it got a workout!  I have one of the copic black bags, but I do not like the little "basket" inserts that go in it.  So I got the egg carton light grid and after doing research and not liking much of what I saw out there, asked Kerry if he could create something with his printer.  He came up with some corner posts that I E6000'd to the grid and made a rack like this


(did you know that e6000 was a verb?  LOL!)

I figure out of the 300+ markers copic makes,  I really only need about 150 for now and that left  some space at the end of my bag.  


The corner posts look like this with little "rests" for the grid to position just above.  Worked out perfectly!  I used some tiny fabric clips that I found in the sewing department at Walmart to hold them together until the E6000 dried.


I needed something to put in the space at the end, so I had Kerry print a couple of boxes.   Yes, the 3D printer will print custom sized boxes.   This first one was too high as I can't get my fingers around the ink pads, so he made a shorter one next.


 Then I had him make dividers for the boxes so stuff wouldn't move around.    The dividers are E6000'd in place.  It all fits nicely down into the bag with room on the ends for my texture cloths and light templates.  This is looking down into the bag.


When I'm coloring, the bag will sit on it's sides and the boxes will come out and rest on the top.  In the left box are my square copics (I do a lot of airbrushing and use these colors the most) and my Momento Ink pads.  On the right are a variety of spritz and dropper bottles filled with blending solution and my white opaque copic paint.  In the tiny slots on the top - that's where I put my extra nibs for the markers.  I tested it out this afternoon and I'm pretty happy with it.  I love that we could use the 3D printer in the art room!  There was even space for my microns pens in the lower right hand slots.


This morning, I picked fresh strawberries out of my back yard.....


Those berries inspired me to use some of these copics because they are such berry-licious colors!  LOL!!!    I used Jenn Dove's tutorial to make this card.


I decided to do some more practice coloring.  Sometimes I think you need to repeat the same thing until you get it like you like!


But then, you need to make a card with your practice coloring!  Made this one for someone very dear to me who's having a birthday tomorrow!


I hope she likes it berry much!  

I am loving my "new-to-me" copic storage.  Now that the markers are organized and not falling all over the place I might actually use them!!!

Once again the 3D printer has amazed me with what it can do!  Kerry is now printing corners and center posts for some of my friends so they can do the same thing!


Monday, November 18, 2013

Grandma's hankies


Remember the story of Hansel and Gretel?  How they left a trail of bread crumbs behind them?  Well, Grandma Moore left hankies wherever she went!  We always knew she had been there because we'd find a hanky!   I think she is the Grandma who taught me how to play. She rolled hankies up and turned them into babies in a cradle that you could swing.  She stitched bonnets on them and made little dolls out of them.  She was very poor, but her heart and her spirit were so rich.  She loved to sing hymns, she loved to praise God.


Grandma would have said, "Life is better when it's fun!"  She would have been amazed with my airbrush machine, copic markers.  And I know she would have tried them all out!!!


She made her own glue out of flour and water.  She would have just loved Stickles!  Strawberries, grapes and cherries were her dye.  Wonderful how God created "art" in the very beginning.


Next I'll have to make some more chipboard cups to put my hankies in.  Oh….life is just so much better when it's fun!!!

Friday, November 15, 2013

New monkeys

I redid yesterday's card using Hammermill paper and it's much better.  So now we know, even though it says that it doesn't bleed, sometimes it does!!!


The left is yesterday, the right is today.


Which one do you like best?

The other thing I have to learn to do is to write down my color combinations as I use them.  Because I forget when I go to sleep!  LOL!!!

Lucy's jeans:  B00, 32, 45, W3, and denim texture with colorless blender.

Lucy's shirt:  R29, 00

Lucy's hair:  E29,21,09

Lucy's skin: E000, 02, R20

Monkey barrel:  E08, 18, 21, W3
Monkeys in the barrel:  E25, E11

Monkey in front:  E000, E21, 25
Paws: E000, 02
Lips: R29, 00
"Tickle me Terry" with terry cloth and colorless blender

So even if you are limited in the colors of copics that you have, you can still do a lot of fun things!  I'll grow my collection over the winter with my 40% off coupons.  :o)  I think it's important to note as well that each of us will develop our own copic style.  I can already tell I like a "watercolor" look, not a pure blended look.  I'm going to prefer glitter on top of my stickler.  I'm going to like the pink/turquoise/green combo that I use with alcohol inks.  But it's going to be fun to just play.

Tuesday, November 12, 2013

Jennifer Dove's Arizona Boot Camp

copyright Jennifer Dove

Ya think you can color?  These are Jenn's boots from her Boot Camp.  I just participated in this year's Arizona camp.....and I'm here to tell you to get on her list and sign up now for the next one!!!  You won't be sorry!!!

Or take a look at her "Color of the Day" on her blog where she blends markers to create a new color just for that day.  I think she's up to 89 today!

I've taken all of her Color of the Day tags and put them into a single pdf file here.  (download it to your own desktop and the colors will show up much better than in google's online pdf viewer). You can add to it after today!

And then I've created a list of all the copic markers you need in order to complete all of the Color of the Day tags up to today.....just so you know what you need to order (and don't forget the refills!!!)  You can click here to pick up that pdf file.

I did a few quick demos with airbrushing and various inks, but I had never really spent time blending markers until Jenn's Boot Camp.  Oh, what fun!  I've placed my order for more and more and more markers.....how many do you need???  :o)


Wednesday, May 1, 2013

More ideas for your copic airbrush


On the third Thursday evening each month, we have a girls night out at the local scrapbook store.  I take a different topic each month and share ideas. I think using the copic airbrush system was probably the most fun night I've had!  Of course...it's "work" for me to come up with creative uses for some of the products I play with, but this was just plain fun!

I found this old wire basket at a thrift store - it was browns, greens, reds and oranges and I just do not like those colors at all.  I sprayed the entire thing white - using a 2 part primer and paint spray.  Then I "hit" spots with pink and mint copics and now I love how it looks!  I love how the airbrush fades to the white edges.   Yes....full of cards I've made in the past few months - great way to store them.


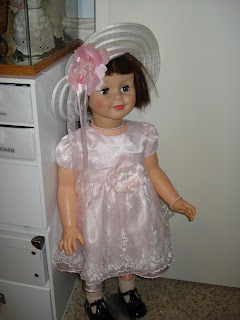
The airbrush is great for giving fresh color back to doll cheeks and skin....but not on this little cutie!  She's wearing a Bonnie Jean dress I picked up for $2.49.  I was able to trace the flower petal pattern, cut it out in white satin, airbrush the satin pink and make the matching flower to add to the hat.


Airbrushing fabric is so easy and can give added color to existing fabric (no you probably can't wash it but I'll never wash this dolls hat) or create matching fabric to any project your are working on.  What have you airbrushed lately?


Tuesday, May 5, 2009

My favorite color

Do you know that if you work with colors that you absolutely can't stand....it will really stretch your creativity. Obviously, Paula does not like the color Green:

So for the last 2 days, we have been giving her everything green!!!  But.....you can add other colors to green, and some glitter, and 
I thought this was fun....use the rose border die as a stencil over the butterfly and "tatoo" the rose on top of the butterfly....

So, I think after all was said and done.....and a whole lot of teasing.....Paula is happy with her box (made with the Ultimate Crafter's Companion!)

Paula.....do you still not like green?  I think it's a wonderful color now!!!

Saturday, April 4, 2009

advanced airbrushing

Isn't it just amazing the versatility of my crafting knowledge? I even surprise myself. But I just pull from my past and bring it forward to the present. Ah! The benefits of age and experience!!!

This piece is made from white paper. So this class will teach you how to use a variety of masks to create airbrushed backgrounds.


Plus...look at this. I've turned an acrylic journal into deocrative clear stamp storage....and even colored the clear stamps to match!!! How fun is that???


Now, go back and look at that first photo. Did you not even notice the miniature starfish (3D) have been airbrushed?

I'll show how to use a variety of items as masks, including nestabilities dies, frisket, masking paper......


diecuts, negative space, torn paper - and show you a clever way to store your paper masks! And as a bonus, there's a segment on using undu - oh, I do love that stuff! Hmmm...looks like someone undid one of my sandals! LOL!!!


If you like airbrushing with copics and live in the San Diego area, contact Scrapbook Your Life! for more details. This is going to be a fun class....and it's limited to just 12 students. And I'll only teach it once!

Friday, April 3, 2009

Play with me

I'm going to do 2 copic marker classes while I'm in San Diego. This one is a beginning airbrush class. And I just love how it turned out.


I've actually precut all the little diecuts on the cricut machine. I'll be teaching how to use diecuts as masks, the negative space from diecuts as masks, How to apply copics to acrylic to create layers using the diecuts, how to paint multiple colors using an airbrush, and so much more!


I've had a regular airbrush for about 25 years. I don't use it often, but I have used it enough in the past that I know all the tricks and tips for using one. When I switched to using copic markers...it took me a little practice...but it's amazing how many of the tips can be transitioned to the copic. While the company offers a certification course....I think perhaps playing with me - you'll learn a few things that they haven't discovered yet!

Tuesday, March 24, 2009

Airbrush experiments

You know, there are moments when I get all caught up in my art and I forget why I first started this blog.  I was chatting with a friend (Hi Vickie!) tonight and she reminded me that every now and then, I should just talk about what's going on in my life!

So, what's going on in my life?  ART!  LOLOL!  I am in a creating blitz this week designing classes for San Diego.  They may never get done as I seem to be going quite slow...until today.  Susan come over to play and all of a sudden....all of the ideas were right here.  I think I finished up 3 classes today. Perhaps what I need is a full time assistant!

If you've never taken the time to read my first week of posts, you'll never know why I started this blog.  I just reread them and realized.....I was probably the first or one of the first "inchie" designers with my layout that included 49 one-inch photos of all bad hair days throughout my life!  LOL!!!  50 years of bad hair.  It's just who I am!

And can you believe that I grew up without a TV?  Imagine that!  We have a TV in every room in the house now.  But funny thing, Kerry is off to LA this week and I don't think I've turned the TV on once.  I really believe that when you grow up without it....it's quite easy to live without it.  Most of my closest friends know that about me and they know to call me when something happens (like 911) and tell me to turn on the TV.  LOL!!!

I promise to start adding a bit more about what's going on in my personal life....but honestly, this week...it's truly all art!  When the "cat's" away.....all I'm going to do is play!!!

I'm brushing up on my metal repousse and this was my first little sample. It's a palm tree  wrapped around a candle and my base was a cricut diecut. Pretty cool.

but look what happens when you take the copic airbrush to pewter - you can literally create your own piece of colored metal.  I LOVE this!!!

For this one, I used a rubber stamp.  I thought it looked a bit like seaweed!  LOL!

This piece has some great depth to it as well:

I finished this one off - I think it could be a pendant....but I also think it would look cute on a card.  Not sure what I'll do with it....but next, I want to do a couple of seashells!


No, next I want to airbrush on friendly plastic!  No.....

OK, I think that list is endless!!! Who knows what I'll do next!  It's what makes being an artist so much fun!!!

Sunday, February 15, 2009

Jammies only

Sunday. February 15. Jammies only.

.....when it's cold outside, it's ok to stay in your jammies all day long
....when you wake up hurting - it's ok to stay in your jammies all day long
....when there's no reason at all....it's ok to stay in your jammies all day long!

Kerry and I both voted to stay in our jammies all day long today! How fun is that?

Usually, I'm sick, have the flu, something has to be wrong to keep me in my jammies all day long.

Not today - it was Jammies Only Day at out house!!!

No cooking allowed, either. We are doing well with leftovers.

No laundry, fixing, fussing. A true "do nothing" day.

OK, but I did make a card. And play with the cricut. And rearrange a closet.

But I swear, I did them all in my jammies!!! LOL!!!

Here's the card....

Now, a cricut and an airbrush.....it just can't get any easier!!!

An mixing with with the airbrushed diecuts - how fun!

Green, pink and yellow copics with a touch of brown and red

And who says you can't alter a diecut?  I cut the "I" off the top of the heart.

Don't be afraid to mix and match what you do!


I wrote this poem for the inside:

You inspire love and fill my heart...
you allow me time to create art!

My feet can dance, my soul can live
My hands can write....of this love you give.

You inspire me in all these things
You are my angel - my hidden wings.

OK, yes, he loved it! :o)

Every now and then, give yourself a "jammies only" day!  It's been great!!!