Showing posts with label Krylon. Show all posts

Sunday, December 15, 2013

Mercury glass - day 2

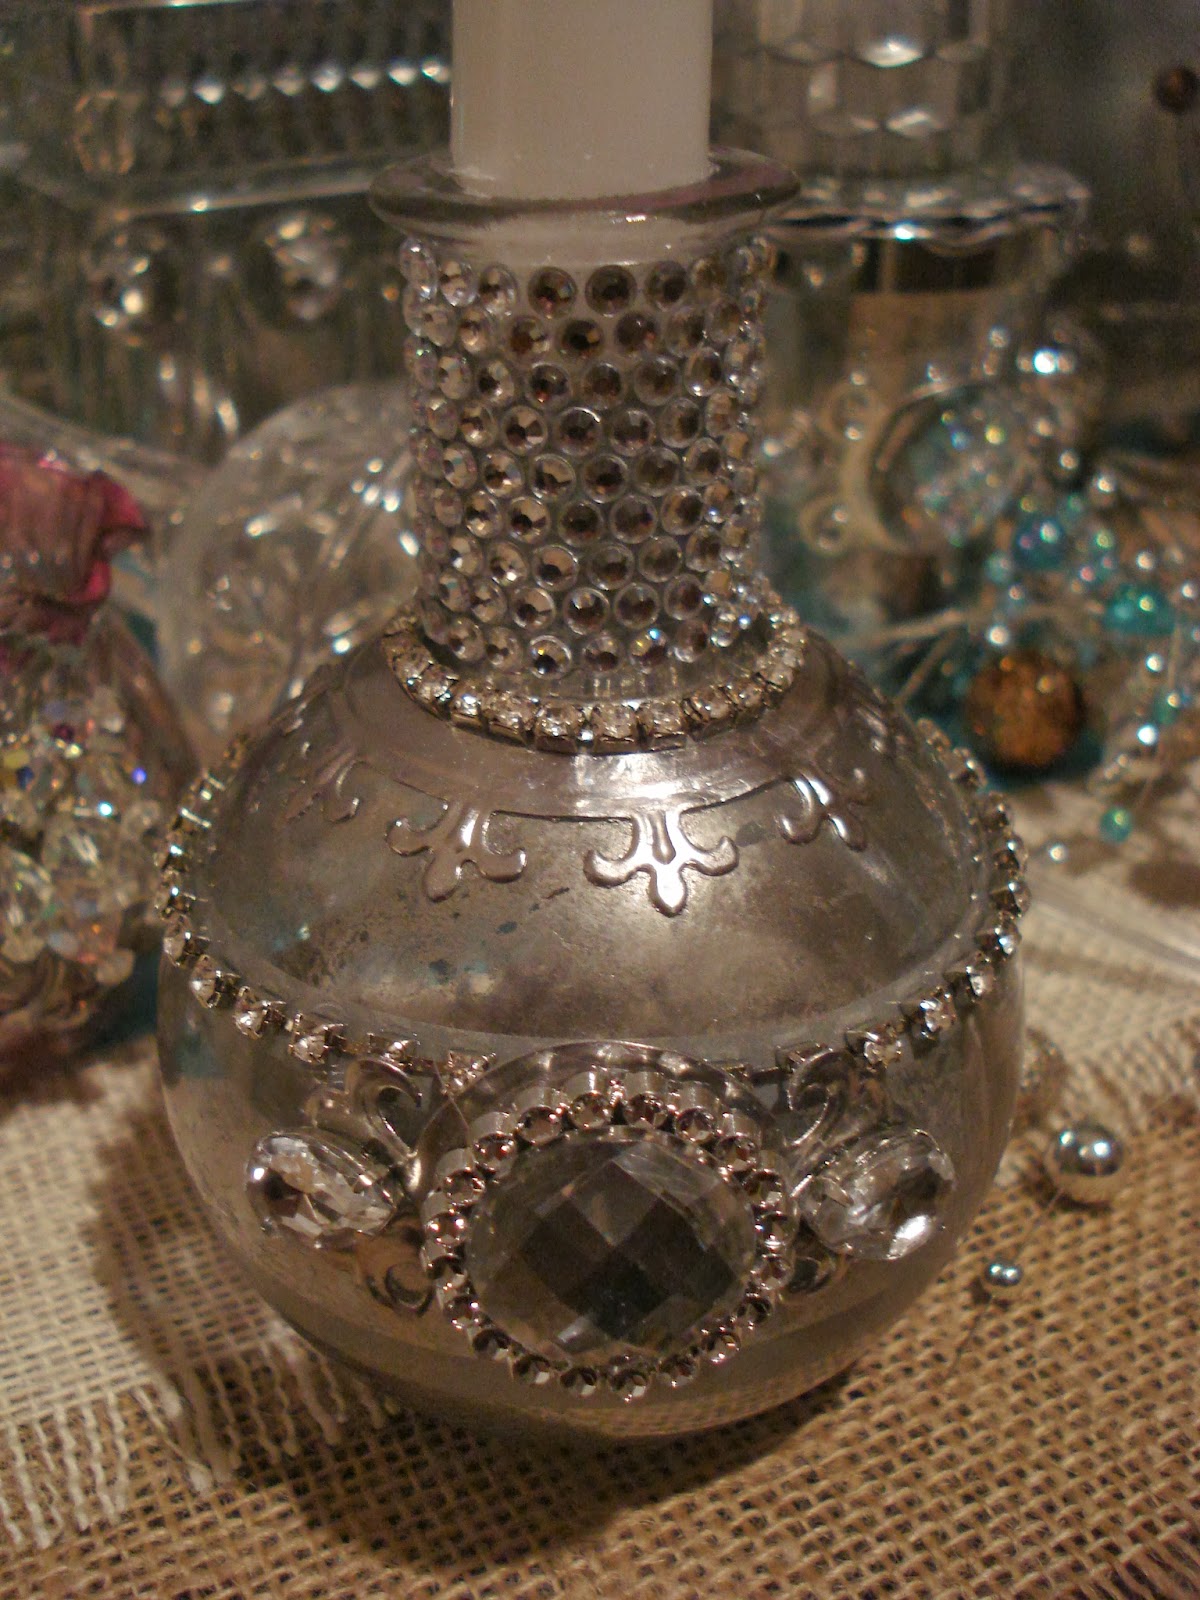
Today, I'm going to share just one of my candlesticks because there is so much detail in this one.  It started out as 2 pieces of clear glass.  The top is a vote and the bottom was a short candlestick.  When I hunt for glass, I will hold it up to a window and pick the pieces that have the most shine to them.  Some cuts of glass are just plain dull.

To add color, I use my copic airbrush system.  For these pieces, I picked my copic sketch marker RV09.  I love that shade of bright pink.  I simply airbrushed the color to the outside of the glass.  Different types of clear glass will give you different results.  The more lead content in the glass, the more shine you will get as well.

Next, I did the same technique as yesterday to get the faux mercury look.  When you blot off the vinegar/water mix, the copic color will show through.  You also need to know that the more layers of Krylon's looking glass paint that you use, the less of the pink copic color you will see.  It's all a matter of balance.

Note - you spray the copic color onto the glass before you add the looking glass paint.  Everything is done on the outside of the glass.

For lots of this, I then sealed the color in with a coat of


I do plan to make a youtube video showing some of these techniques - but I need to get more glass first!

Around the base, I have used Spellbinder's S5-079 Persian Motifs - the large circle.  In order to get it to fit, I simply cut it open in the back.  The center was removed using #3 from The Standard Circles Large Die.  This is cut in Amaco's pewter which can easily be shaped around the glass.

I use either E6000 or 527 adhesive (both at Walmart) when adhering my embellishments to glass.  On occasion, I can get a cool glue gun to stick, but that will usually pull right away from the glass.


around the top of the bottom candlestick, I used #5 from Spellbinder's Parisian Motifs.  The center was removed using #5 from the Standard Circles Large set.  Look at how nicely it wraps around the edges to make a wonderful border.  And this pewter simply shimmers in the sun!


For the center, front, I used the square motif from the Parisian motifs die (see link above) and covered it with another piece of an ornament that I took apart.  I added a broken piece of jewelry in the middle center front.


There is quite a bit of depth to this piece as you can see from this side shot.  See how nicely the pewter will shape to the contour of the glass?


and from the top looking down, you can pick up hints of silver on the rim


remember, this all started with 2 pieces of clear glass from the thrifty store that someone else discarded. I think this is a great example of what you can do with someone else's trash.  :o)


And just think….I haven't even lit a candle yet and there's so much shimmer and shine going on!  Gotta love Spellbinders die cuts in pewter!

Saturday, December 14, 2013

Mercury glass and more - 1

Oh what fun it is to play…..


I'm going to spend the next few days sharing how I made these.  So first, you need to go to your local thrifty store and find glass.  Almost anything will do.  Clear glass, colored glass….all sizes and shapes.  Here's an example of a bottle and a candle votive that I found (of course, they were clear glass when I picked them up).  


While you are in the store, stack them together.  Get different heights.  Get some that will use votive size candles, tall tapers, short fat candles….and pick up used candles while you are at it.  I have several youtube tutorials showing you how to repair, restore and reuse old candles.  


In the days to come, I will share a variety of techniques, but for the look above, you will need Krylon's looking glass paint  (Walmart is the cheapest place if you can find it there).  You need a fine mist spray bottle filled with a mix of 1/2 water to 1/2 vinegar.  I don't think it matters what type of vinegar.  

For this particular bottle, I sprayed 1 coat of paint on the outside of the glass, then patted it off with a Viva paper towel (Viva is soft and flat, no embossed design in it).  Let it dry for a couple of seconds, then sprayed another layer, patted it off….did that 3 or 4 times.  

Next, I immediately spritzed the outside of the glass with the mix.  Let that set for 2 minutes.  It might not be dry, but that's ok.  Pat it off with your paper towel.  It will remove a little bit of the paint.  If you want a different look, rub it a little.  If you don't like the results, just soak the glass in 1 cup of vinegar in a sink full of water and rub all the paint right off.  I make several mistakes so always need a useable remedy!


I've made 23 of these in the past couple of weeks, so lots of experiments, loads of failures, and I'll be sharing different shots of the sun reflecting through them all.


 First up is this little glass bottle.  Remember - it started out clear.  It was someone else's junk.  Now it's my little treasure!  Rows of adhesive crystals around the top and then at the bottom of the top, a row of sequins.  These are the kind that you can buy by the yard in the fabric section at Hobby Lobby.  Note, you can slide them apart, or scrunch them up close together which is what I did here.

Below that is a Spellinder's die.  This is from the Fleur de Lis Motifs and the center was removed using #3 from the Standard Circles Large die set.  Cut using Amaco's pewter - which is very flexible and will bend down around the glass and stretch to fit whatever you need.


In the front center of the glass, I used the medallion from the Fleur de Lis Accents set.  The bling on top of it comes from a half off ornament at Hobby Lobby.  Look at the ornaments carefully as most of them will just pop apart with a little bit of undue.  

Note that I'm using just the paint on these.  Tomorrow, we'll add a bit of color using the Copic Airbrush system!  Can't wait to share!!!

Monday, January 19, 2009

Heaven on earth

I have been thinking lately about my poor Sunday School teachers when I was a kid. They must have just shuddered when they saw me walking into class armed with my Bible....and all my questions! I remember questioning one of them about the Lord's Prayer:

"Our Father, Which art in heaven, hallowed be Thy Name.... Thy Kingdom come......on earth as it is in heaven."

Did you ever stop to think about that? He taught us to pray for His Kingdom to come to earth and be like it is in heaven. I remember asking, "where on earth is it going to be?" I remember they told me it was NOT going to be on earth....it was up in the skies because we were going to be "raptured" and taken there.

Well, with a little bit of Bible study, I haven't actually found the word "rapture" anywhere.....but rather than us flying off to someplace called heaven that is up in the skies.....I tend to think we might board an airplane and fly over to Jerusalem, where His kingdom will be set up on earth.....as it is in heaven. I know...I'm really giving you things to think about, huh? Is it too much? I don't ask that you agree.....just that you try to seriously think about what was written "then" vs what is going on in the world now.

If Jerusalem is to be where His kingdom will be on earth, then for that single reason, I stand with Israel. I stand with the Jews.

Where do you stand?


Hamas is a terrorist organization. I was in Israel in October 2005 just days before Israel withdrew from the Gaza strip. I have been following the news daily since then. I know that Hamas has continued to send missiles into Israel. And Israel has a right to defend her borders from attack. Waiting over 3 years...I believe they have been more than patient.


If you watch that video, simply ask yourself one question....."Have we already forgotten 911?" Have we forgotten what a terrorist is capable of doing? The shock of watching them take their own lives as the airplanes crashed into the twin towers? Have we become so apathetic that we do not care what terrorism is doing to Israel?

I stand with Israel. I stand with the Jews. And I am creating art that affirms my beliefs.

I love creating art with a purpose.  OK, I can't tell you how much I am loving this!  This collage started as a t-shirt that I cut up and stretched on a regular artist's canvas:


and then I used Radiant Rains to turn the white cotton to wonderful colors that shimmer!  Yep....radiant rains on cotton - so cool!  Then I put Glossy Accents over the letters.  When that dried, I took my Ranger white pen and gave "shadows" to the letters.  Used my cuttlebug embossing folder and embossed the candles in copper and then hand-cut them out.  That's an EK Success Star of David embellishment that I painted with Dabbers, then Krylon copper pen on top.


At the top, another cuttlebug cut and emboss folder for the dove and leaf - with stickles over distress ink on that one.  The Chai letters are cut from paper by Zsiage.  I have always thought that the golden bear (Vail CO) looked like the Chai, so I took one that I don't use any more and added it here.  Below that, a $20 shekel bill (is that what you call them?) and some coins from our trip to Israel.  


This was kind of cool.  The flag is printed on Jacquard's printable silk.  and backed with paper.  There are 2 other unbacked flags in the collage - do you see them?   One of mom's watercolor roses and some silk flowers.  More candles for a total of 8 - for 8 nights of lights.  Diecut flourishes and swarovsky crystals.


A closeup of a piece of vellum that I hand cut, added alcohol ink, and then my white pen:


I think I posted this shekel before, but wanted a closeup here - it's Art Clay Silver over a coin.  Just love it!


This is a complete experiment and I don't know if I like it or not, but it works on this collage.  It's glass from Amaco and the Star of David is brass that I fired between 2 layers of glass.  Look at all those air bubbles - extremely interesting, huh?


And finally, a close up view of the flag printed on silk, backed with paper.  I used tiny mixing straws behind this to make the "waves" in the flag.


I have fallen in love with this collage.  Wherever I stand, I stand with Israel.  Where do you stand???


Thursday, July 3, 2008

Home decor

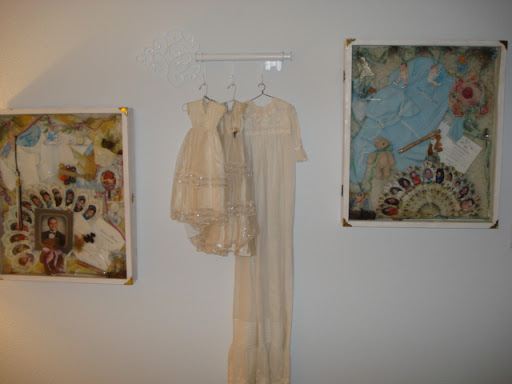
I'm trying to downsize, but there are just some things that will stay with me even into the nursing home! LOL! So today, I worked on hanging them on a spare wall in the guest bedroom. In the center was today's project.


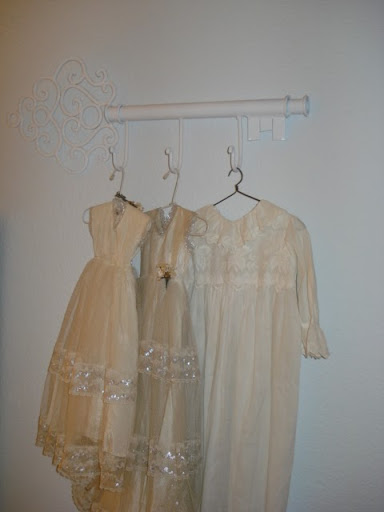
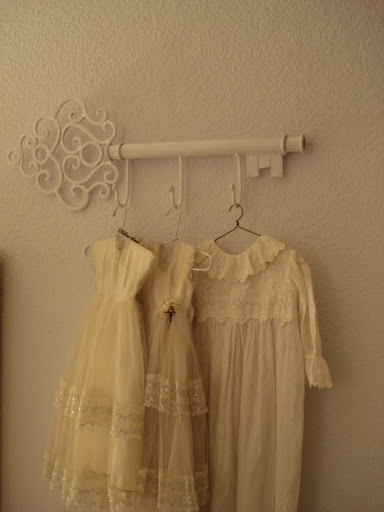
It didn't photo too well with the flash on, but that was a brown/black metal key from Hobby Lobby - on the 66% off aisle. I needed something to hang the 48" long christening gown on. And the 2 vintage doll dresses. A layer of Krylon primer and 2 layers of Krylon white glossy paint - and I have a white key!


Everything in my life has some kind of meaning. The christening gown is one that was given to me when I had an antique shop in San Diego. It was totally brown with loads of bug stains and big holes in it. I used Biz to clean it and then Japanese paste to mend the tears. If you looked at it today, you would not be able to see any damage at all. I need to find another piece of old vintage clothing and then I can do step shots as I go through the process of repairing it. The other antique dealer who gave it to me could not believe the restoration job I did on it!

The little doll dresses - well, they are the kind I always wanted for my dolls when I was a little girl - all pretty and covered in lace. I've decided it's never to late to awaken that childhood spirit that lives deep inside of each of us! So here they hang - reminding me every day that it's ok to be a kid, to have some fun, and to play a bit!


On the left is a 2' x 3' shadowbox filled with Jason's baby things. Tomorrow I will blog more on that and share some techniques for preserving your kids things.


On the right is Jeff's shadowbox. We'll be talking about that on Saturday.


I know so many people put their kid's baby things in boxes and store them away. I wanted to display them, look at them, share them with others, and just enjoy the memories of their childhood on a daily basis. I know also that I don't have room to display all the momentos I've accumulated in my life, but these 2 shadowboxes bring great joy and lots of smiles to me. The boys can certainly wait another 30 or 40 years to have them!!!

Friday, June 27, 2008

Altering 101!

My friend, Rose, was here from Wales. Now Rose is an amazing shopper, but what's even more amazing is the amount of stuff she can fit into her bags and still be under the weight limits! She had been here for a couple of weeks and her bags were at the max when she saw this dressform at Hobby Lobby:


She really wanted it, but there was no way to get it back to Wales!!! Needless to say, when I saw it on the 60% off rack this week - I got it! Just to tease Rose! OK, I didn't really like it, but I had an idea. First, I painted a layer of decoupage on it to seal the jute it is made of. Then sprayed a layer of primer, and finally a layer of white gloss paint - all Krylon paint. And now it looks like wicker - but it's not!


Next, I cut ribbons in 1 1/2 yard lengths and started threading them through the waist. Yes - it's going to be my new ribbon storage system! Dare I do one in each color? LOL! OK - I'll just do one and keep my blue, turquoise, silver and white ribbons on it!


Not bad like this, but am I done yet? That's the whole thing about altering something. This is what I originally envisioned in my head. But when I got here....it just lacks something. So the next step is to just start looking around the house to see what you can find!


I saw this turquoise and gold scarf that I picked up on our trip to Israel. I don't wear it. But I love it! And I thought "now, wouldn't that make a perfect bodice?" and started wrapping it around the top of the dess form. Just absolutely perfect!!!


When it comes to altering things, you will just have to have a cut-off point. I found these gold rhinestone chains and earrings and they just added the final touches!


And then I place it next to my little Judaica corner. Two of mom's paintings, a peddler doll I made, an American girl doll dressed for Hanukkah, a menora, and my journal from Israel. It's just perfect!


I seriously doubt I will use any of the ribbons from her skirt - but they are there if I need them in a pinch! In the meantime, I will just enjoy this and every time I look at it, I will think of Rose. I really should thank her for not buying it when she was here because now I have a wonderful addition to my "storage" ideas!

Saturday, March 15, 2008

Restoring dried out markers

Don't you just hate it when you take a marker out and you get that dried-out look? I know I do!


Take a pair of pliers and pull the brush tip out


Spray just 1 or 2 squirts of Perfect Refresher down into the barrell. I will also usually spritz the tip that I just took out.


Set it down in a jar so the tip is facing down. After just 20 minutes....look how much ink came out on the brush!!!


It doesn't matter what kind of marker it is. Here's a dried out Krylong copper leaf pen. Look how dried the marks were:


I spritzed the end, put some refresher down in the barrell and immediately, it started painting again!


I have had many of my Marvy Markers since 1992. SERIOUSLY!!! I just keep bringing them back to life using Ranger's Perfect Refresher.

But once again...if you think you want to toss your markers out.....send them to me. I will repair them and get them to the local home school network so that these kids can have a chance to learn how to play! After all...it's not what you learn....it's just that you learn to play! LOL!!!