Showing posts with label Susan Mostek. Show all posts

Tuesday, October 27, 2009

Friendly Plastic Fun

Getting back to some of the things we did in the playground.....how about embellishing some Tim Holtz flowers and leaves with a little Friendly Plastic? Sure makes them totally different!

And then you can attach the flowers to anything - this is a little 2.5 x 3.5 ATC that we made for the playground:


I have 2 kits left where you can make your own flowers and ATCs - just $10 and you get the whole package of TH flowers!

So easy to do, and so much fun. Just cut little pieces or use up your scraps....

And then Susan Mostek taught this class where we decorated nicho boxes using Friendly Plastic. This one was made by my sister, Colleen Lee. Just so cute!

When you stop to think about it, there really is no limit to what you can make or do with Friendly Plastic - just so much fun!!!

Now, we're supposed to get 8 - 14" of snow tonight, so my plans are to lock myself in my studio tomorrow and see what I can come up with! Hopefully a video or 2!!!

Stay warm!!!

Wednesday, June 24, 2009

Tues Suz

So, do you just scan the photos, or do you really read what I write? Because this is all about facing your creative demons.....and it starts with Susan! The photos are just fillers. OK, no, Susan is NOT a creative demon! LOL!!! I can just here her giggling as she reads this.

The story starts several months back....well, maybe nearly 2 years ago...when the Basement Babes (take note that this group meets on THURSDAY) had a playday with metal clay. Although I've been working with paper type this month, most fine silver artists use the clay type. It comes in small lumps and you have to knead it quickly and shape it, made your creation before it dries out.

Here is Colorado, the air is quite dry, so this is a learned skill. If you don't work fast enough, the clay will start to crack and eventually it will just crumble. Now, you can spritz it, dip your finger in water and rub over it, all kinds of little trick to extend your working time. And I always use the slow dry brand so my students have a bit more time to play with it.

On this particular Thursday, Susan had a creative demon. She just could not manipulate the clay. It dried. It cracked. It crumbled. I gave her a new block (gasp!) thinking it might have been bad clay. Nope....it was "bad" Susan as she did the very same thing with the second block. And believe me, she was getting exasperated and totally stressed about this time.

So I made a little joke. I told her that we would have to start calling her Tues Suz. She gave me the saddest look and said, "why?" And I replied, "because you can never come back on Thursday if we are playing with clay....you have to come by yourself on Tuesday!"

Guess what? The nickname stuck!!! And we have had many wonderfully funny jokes calling poor Susan "Tues Suz" and suggesting that she return on Tuesday to finish whatever it is we are working on.

HOWEVER.....yesterday was Tuesday. Susan was here. She offered to help me with anything I needed to have done as prep for the Metal Clay conference. We started out with a trip to the Bead Lounge in Longmont, then lunch (I like to segway into my "working" day!) and then back here where I had her looking up product numbers in catalogs for me. Finished that project and I said, "are you ready?" She said, "you bet!" - not having the foggiest idea what my next project might be!

I think Susan thought we were going to go down to the basement and work in my "Lucy McGoo's Little Store"....but I surprised her! I brought out the paper type metal clay and told her we were going to make silver charms!

LOLOL!!!


After being banned from touching metal clay for the past 2 years, Susan did a fantastic job! I think she's even a pro at paper type! And it got me to thinking. What do you do with your creative demons. And I realized I do exactly what Susan did with hers. She flunked our metal clay class (literally) and then set is aside for months on end. When she came back, she approached it with a different angle and had a huge success.


Sometimes, I think we get caught up in the craft media frenzy and push ourselves to do what someone else is doing. Perhaps this is not the moment for us to go that direction. Perhaps we just need to set it aside, give it a rest, and come back to it at a later date.


And then I realized....this is exactly what I do. And it's probably the reason I dabble in so many different mediums. But I truly love it! It also dawned on me that I'm no longer going to struggle with something when it doesn't work for me. I'll just set it aside, give it a rest, and come back to it another day, from a slightly different angle, and see if I can have a success then.


From the photos posted here, you can certainly see that while Susan was here on a Tuesday, I believe she has mastered the art of paper type metal clay!


Susan, you rock! Thank you so much for all the help, fun and giggles you provided yesterday!!!


I really do have the best friends on earth!!!

Monday, June 22, 2009

Fairy-less fairy box

I've had my head buried in metal clay, so Susan invited me over for a play day today. I was supposed to make a Fairy Box. I think I flunked! I didn't put a single fairy anywhere! LOL!!! I started out with a micro cigar box. It's about 4" x 5" and under 1" thick.


Found 2 of these at a thrift store a few years back and had never used them.


I totally love the end results - even if there are no fairies - it has a "fairy" quality about it.

The top says "As I remember a little girl"

And you open it up and there are women of all ages in the bathroom. "The secret of staying young is to live honestly, eat slowly, and lie about your age!"


Here's a closeup of the right side, which is the base of the box. Vintage lace on the top, net down the side.


My favorite scene - she's dressed - and in the bathtub. Note the bubble bath behind her? And the rug and towel made out of bits of felt. The bathroom fixtures are micro mini doll house furniture that I inked to distress. That stool beside the bathtub is not even 1/2" tall. The bathtub is 1" tall. Sort of gives you an idea of the scale of all of this!


I think she's thinking, "It's glorious to have time to just sit down - even if it's on the toilet!" See the toilet paper to the left?

The little old ladies were black and white - color added with chalk.


Truly love the effect of netting!


tiny little paper flowers about 1/4" across. Yes, I nearly went blind today and I forgot my magnifiers!

I do like this little scene. The swam is about 3/4" tall. Just so tiny and delicate.

They're trying on new corsets. Love it!

And I think these 2 are just waiting until they can grow up and join in the fun!


What an absolute fun day! Most of what I used is from Crafty Secrets - they have wonderful stuff! I could go back and add wings.....but I think I like it just like it is!!!

Sunday, June 7, 2009

Lea's graduation card

Our neighbor's daughter who is 33 just got her Master's in Library Science. Kerry asked me to make her a graduation card. Well, we don't go to many graduations and I don't have anything "graduation-y" in the house. So I told him we'd have to go buy her one.

And then I got to thinking about Lea. She is just so sweet, plays the piano, teaches piano to kids, loves books......and who says a graduation card has to be anything about "graduation"? I finally got myself out of THAT box! LOLOL!

Used some Basic Gray paper and diecuts and Susan Mostek's slider card design.  Even made an envelope!


Fell in love with this paper the more I worked with it. Amazing how many different cuts you can get out of it.

So, when you pull on the top fibers, the card slides open at the top and the bottom:


Here's a close up of the top

I used a Spellbinder's die to make a pocket to insert her gift check in the bottom part

And guess what?  She absolutely adored the card.  I'm pretty sure it was the only hand made card and I'm so happy I made it because I know she will love it!


Tuesday, June 2, 2009

A playday with Susan Mostek

How fun to just sit and play and experiment and try things out!!! Susan is going to be teaching a Nicho Box class at our upcoming Starving Artists Playground and these are a couple of samples that she came up with today. We were looking for ways to tie them in with Friendly Plastic and used our clay cutters for this design.


On this one, I taught her how to make Liz Welch's cute little flowers and they are just perfect!!!


I'm hoping you can get an idea of the depth on these boxes here....with beading and netting on the inside, the lid opens up and you could pur anything you want inside.


It is truly exciting for me to see what the Playground "monitors" (ok, you can call them teachers if you want!) are coming up with as we make progress on our Playground Playshops!!!

Once again, ya gotta love this resurgence of Friendly Plastic - it's truly an amazing product!!!

Thursday, May 7, 2009

Mostek & Moore

So if you take Susan's married name and my maiden name......I think it sounds like a couple of lawyers!!! What if we shortened it to just our first initials???? We'd be the M&M girls???? LOLOL!!!

I cannot than Susan and her mom and dad enough. They let me stay with them for a night and treated me to a completely and totally pampered day in San Diego.   I got to lay by her parent's pool and watch birds all day long.  OK, I do not know that I have ever watched birds OR sat by a pool that long!


Of course, that was after Susan taught at Scrapbook Your Life on National Scrapbook Day.  

Have you ever heard of an EMERGENCY class????  or how about an EMERGENCY demo?  Well, at Scrapbook Your Life, we are ever so accomodating.  Susan had students who wanted to learn how to do her second class, but already had commitments during the afternoon, so she did an "emergency" class.  We simply walked around the store and got enough new students to throw in a 3rd class for the day.  What a trooper!!!


And, of course, while Susan was doing an emergency class, I was on the other side of the room doing "emergency" demos.  I had posted a schedule of what demos I would be doing and when during the day....but we threw in a few "emergency" ones for those who couldn't get back to the store at the right time.

What a totally fun day!!!

Wednesday, April 29, 2009

Gift Certificate cards

We are giving away $150 in gift certificates at the store this week and needed to make gift cards to put them in....so we borrowed Susan Mostek's slider cards again:

Layered diecuts with stickles

and just look when you pull it all the way out......
And here's another one - love the paper!

Here's the cover:

And the whole thing:
I am having such a great time!  So much fun!


Thursday, April 2, 2009

Susan Mostek's Friendly Plastic

I just had to share these pieces - she's such an amazing "student". Look at this first one. The center looks like a watercolor painting that she framed...but it's not It's one piece of inlaid friendly plastic - made with scraps. And then embellished with wire and beads. I think this is such a gorgeous pendant! Amazing wha tyou can do with scraps!


And here's one she did with a butterfly that Jodi made and didn't like. Yes, Jodi, you did too say you didn't like it! LOLOL!!! Hmmm....do I have Susan digging in the trash over here? LOL! Such a stunning piece of jewelry - I might have to make some butterflies like this!


I really love the background she did behind the butterfly.

OK, I ran to walmart and have to tell you this. At the checkout, the young girl looked at me and asked, "Are you over 18?" I was perfectly dumb-founded and just stood there - literally unable to answer her I was in such shock. (OK, just in case you don't know - I'm 57 years old and I couldn't understand how on earth she couldn't figure that one out!!!) She continued, "By law, we have to ask that question to anyone who buys Sharpie markers - apparently the kids are sniffing them."

I immediately said, "If I were 18 and had this body - I'd be sniffing them, too!"

I thought she and the lady behind me were both going to die laughing!

LOLOL!!!

OK, now you have had your funny for the day!

Tuesday, December 16, 2008

Think happy thoughts.....

Did you know that studies have proven that if you wake up in the morning and tell yourself that you are going to be happy today....that you will be?

And that every time you start to think of something sad, if you change that to a happy thought - then pretty soon all your thoughts will be happy ones?

And that if you are a happy thinking person.....you can infect those around you and they will become happy thinking people as well!

OK - let's give it a try!!! I absolutely love making slider cards. I learned this from Susan Mostek who is an amazing artist. She was over last week....and of course, we made more slider cards. This one is titled "think happy thoughts" - of course!!!


When you pull on the ribbon at the top, the top and bottom slide out. Notice now that the heart is different from in the first photos?


 That's because it's an aperture cut - made with my Spellbinders nestabilities heart.  Cut thru 3 layers of paper to create an opening.


And the slides are just black cardstock, with birds cut from the cardstock, and lots of white ink and white pen work .  Just love Ranger's white pen!!!


Did I threaten to do a tutorial on how to make this card?  Or shall I just make you all come take a class from me?  LOL!  OK, now remember - think happy thoughts!!!  Paper, birds, hearts, flourishes, swirls....yep, pretty happy with all that I think!!!

Saturday, September 27, 2008

Pulling the other way

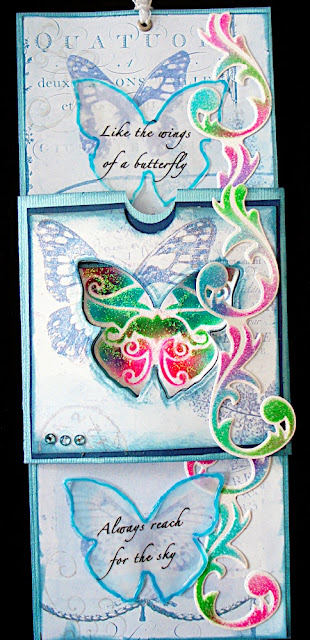
I honestly think that when you do something, you need to turn right around and do it 2 or 3 times again so that you will imbed the process in your brain! So, last night, I made another pull card. Of course, with me, I get terribly bored if I do the same thing over and over, so for this one, I decided to figure out the mechanics of how to make it pull up and down instead of side to side....and how to add diecut cutouts to the front for a window.

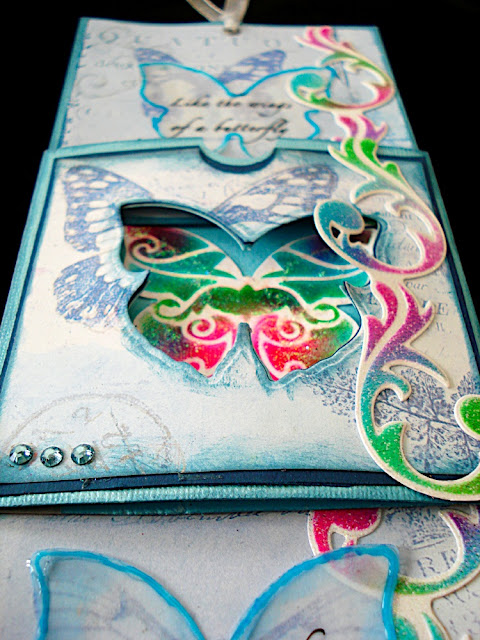
OK - it may have been way too late for that kind of calculations! But I think it turned out great! I used Spellbinders butterfly die and the new 12" border die.


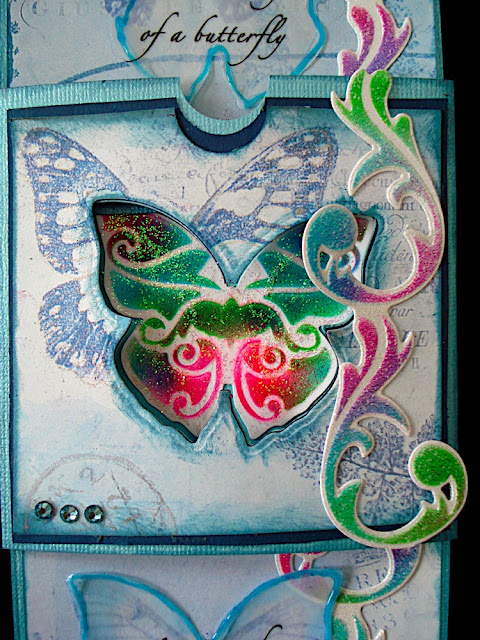
For the border flourish, I diecut, embossed, then used the airbrush to add color while the paper was still in the die - using the stenciling side to get this effect. Then I added a layer of stickles and a layer of glossy accents - so there is a lot of dimension to this piece that the camera does not pick up.

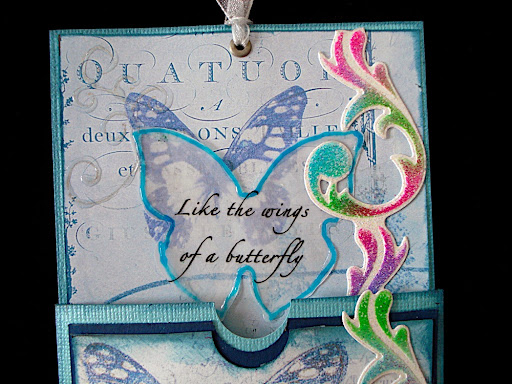
The window is cut out and behind it, the sentiment was printed on vellum (print first, then cut) and attached to the background. Yes, you cut the butterfly out of all 3 layers of cardstock, then line them up to form the aperture.

When you start to pull it open, you can see that the background butterfly with the sentiments is going away and the border is continued on each background piece:


Here it is fully opened.


I used some stencils and a glitter pen, then went over that with glossy accents for a faint background swirl.


For the center, the hidden background now shows and it matches the coloring of the swirls down the side.


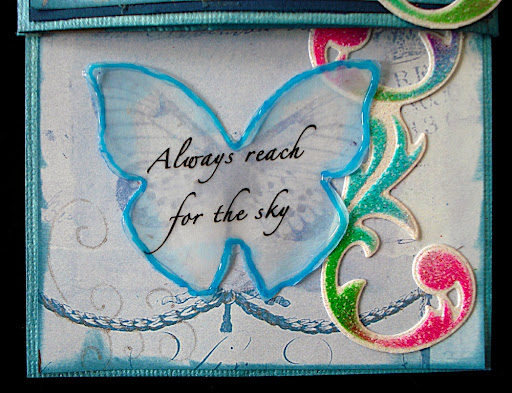
And the bottom matches the top card:


I wanted you to get a feel for the dimension on this piece. Several layers. But oh! What fun!!!


"Like the wings of a butterfly, always reach for the sky!"

Only a great teacher like Susan could inspire me to push myself to turn her technique for a pull out card into something this much fun!!! Thanks Susan!!!